What if I told you there was probably a simpler way for you to do a lot of the things you’re currently doing by hand with your Showit website that would save you time AND help you lose weight while eating as many donuts as you’d like?
Okay, the losing weight thing is unconfirmed BUT the other stuff is the real deal.
Let’s say, for example, on your About Us page you have a list of people on staff.
Then one fateful day Connie comes in and gives you her two-week notice. You’re honestly a bit relieved because Connie is the source of a lot of office-related drama.
BUT, then you realize you need to go in and take her off the website. There’s the rub!
Connie was the 3rd hire on a list of 15 other employees.
You now have to rearrange your entire staff on the About page when you go to delete her.

Lots of tedious work THAT YOU ACTUALLY DON’T HAVE TO DO.
OR even those pesky FAQ pages that take tons of time to set up and even more when you have to make changes.
NO MORE!
There’s something you can do to make all of those changes in less than half the time it would normally take you in the Showit app.
What is this dream solution that I’m talking about?
WordPress Custom Post Types, my friend.
And, with just a little bit of knowledge, it’s going to be your new best friend.
Table of contents
- What You Need to Create Custom Post Types on Showit
- 1. Setting Up The Custom Post Type Plugin in Your Showit Blog
- 2. Basic Settings for Your Custom Post Type in Your Showit WordPress Site
- 3. Additional Settings for Your Showit Blog Custom Post Type
- 4. Add Posts to Your Custom Post Type in Showit
- 5. Creating a Template for Your Custom Post Type in Showit
- 6. Add a WordPress Canvas in Showit
- 7. Adding Your Content So Your Custom Posts Show Up
- 8. BONUS: Reordering the post
- The Joy of Adding Custom Post Types to Your Showit Site
What You Need to Create Custom Post Types on Showit
Before we dive too deep, let me give you some background for those who are new to Showit and/or WordPress. If not, skip on down to get started.
Your Showit website can actually connect with WordPress which means that you have both the most powerful website builder out there AND the most popular website content management system on the planet at your fingertips.
How does all that power feel? Ready to apply for the Avengers?
Think about it! You can do pretty much anything you want with the right plugins.
WordPress’s superpower is its ability to take content that is kind of repetitious like a blog post and make it easy to add to your site.
So, every time you want to write an article you don’t have to go to the Showit app to create a whole new page from scratch and add all the text by hand.
You create the template once and then you just add the blog post to your WordPress dashboard.
What is a Custom Post Type?
You can do the same thing for ALL SORTS of different content NOT JUST blog posts!
What do I mean exactly? The best way to teach you is to probably just show you.
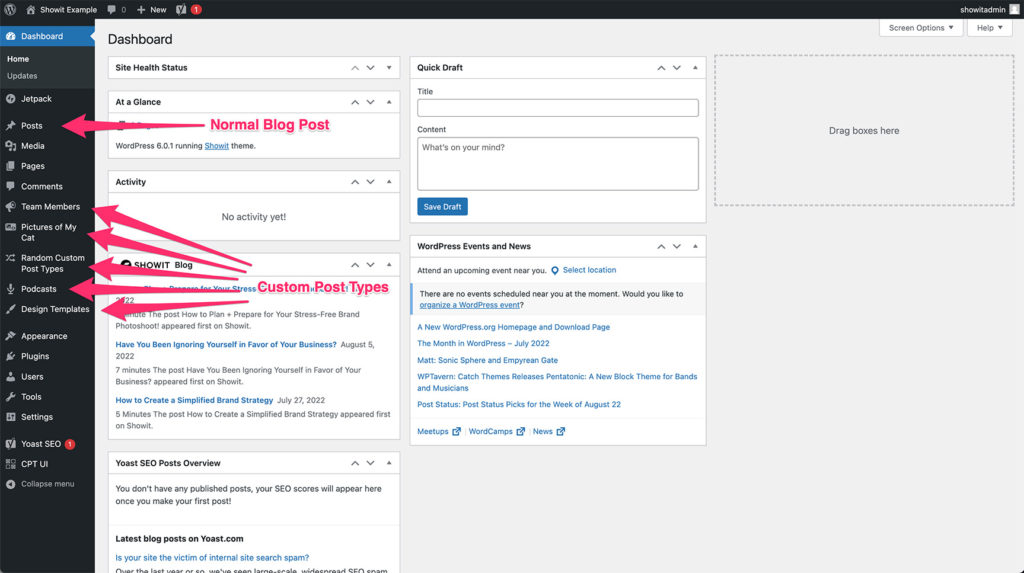
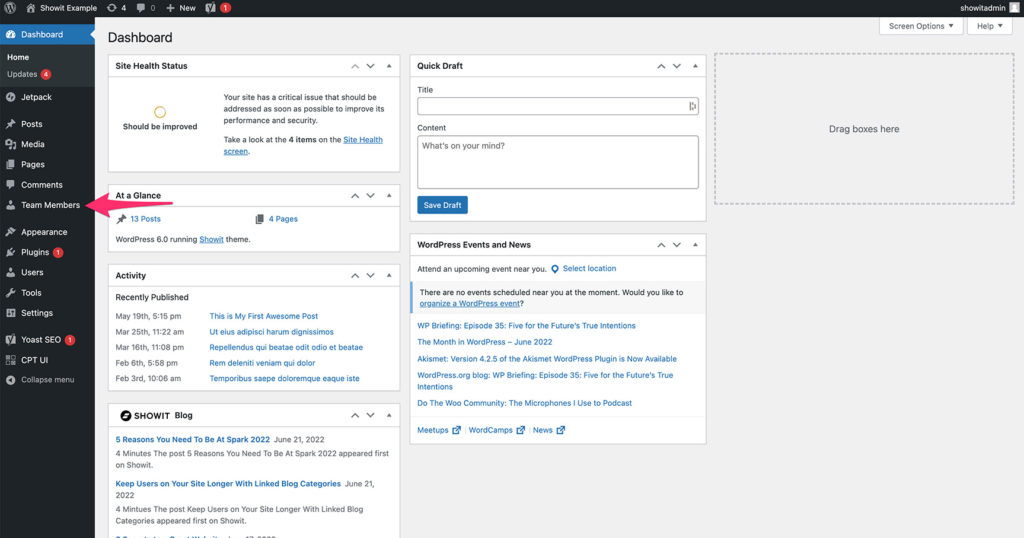
You’ll see in this image what looks like a normal WordPress dashboard. And, with that normal WordPress dashboard, you’ll see the normal place to add Blog Posts.
Nothing extraordinary. BUT, look a little bit further down and you’ll notice some other things that you won’t find on any other WordPress site. How do I know? Because I made those.
They are Custom Post Types for things like Team Members, Pictures of My Cat, Random Stuff, Podcast Episodes, and Design Templates.
Those are all unique post types that I can make look completely different in layout, design, and style from one another AND from a normal blog post.
So, not only can it save you time BUT it gives you the option to be more creative in how you want different types of content to look!
So, cool right?!
What You Need to Get Started
Now, to do a lot of things outside of adding blog posts you do need to be on our Tier 3
That gives you the ability to add your own plugins, which will give us the power to add the wonderful tool known as a Custom Post Type.
If you aren’t on the Tier 3 plan yet, reach out to our amazing support team and let them know you’re ready to up your game.
If you’re already on the Tier 3 plan then follow along with me while I show you how to create a custom post type for team members on an About page.
Alright, are you ready to add a Custom Post Type of your own on your Showit blog? Let’s do it!
1. Setting Up The Custom Post Type Plugin in Your Showit Blog
The first thing we need to do is add a plugin called Custom Post Type UI. This is one of my favorite plugins to use AND it’s super popular.
With 1 million-plus active installations, you know something is going on that’s probably pretty awesome.
To add CPT UI login to your WordPress dashboard and go to Plugins
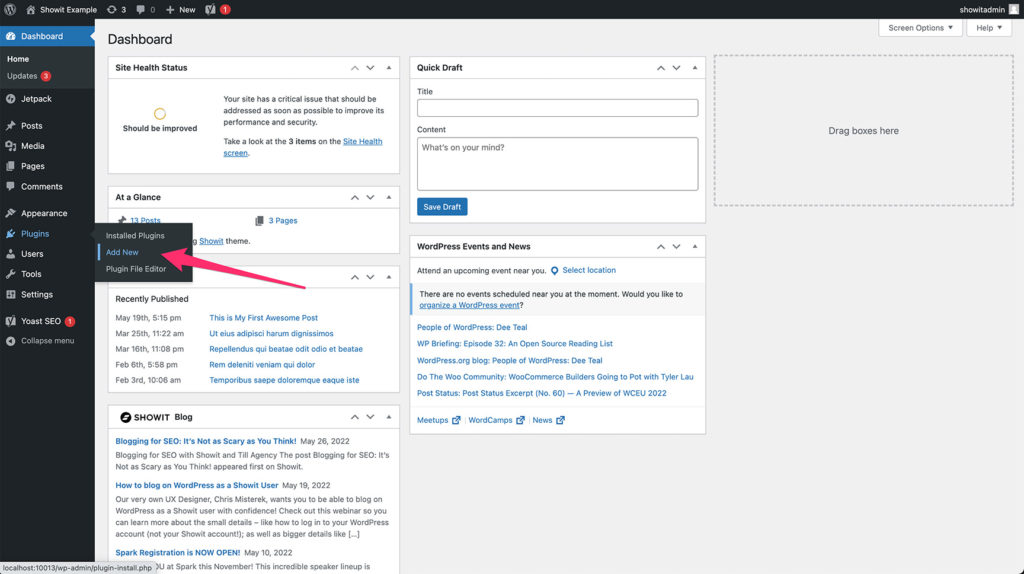
Type CPT UI into the plugins search field and the right one should be the first to show up. In case you’re wondering, the one we want should have 1+ million active installations AND be created by WebDevStudios.
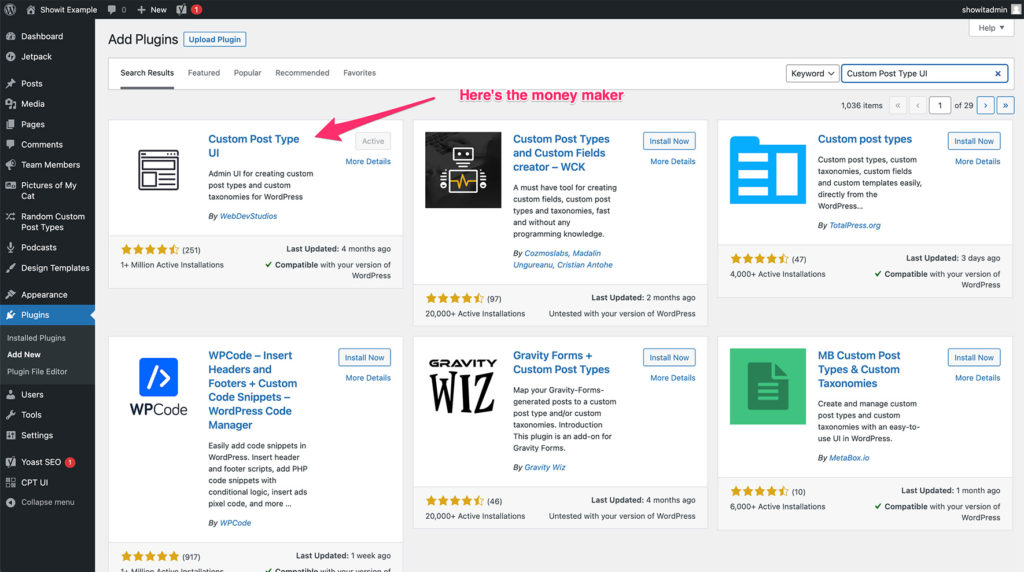
Install that puppy and activate it.
Now, you should see a new link on your dashboard near the bottom that says CPT UI. If your dashboard doesn’t look exactly the same DON’T FEAR! As long as you see the CPT UI link with its little square icon you’re good.
2. Basic Settings for Your Custom Post Type in Your Showit WordPress Site
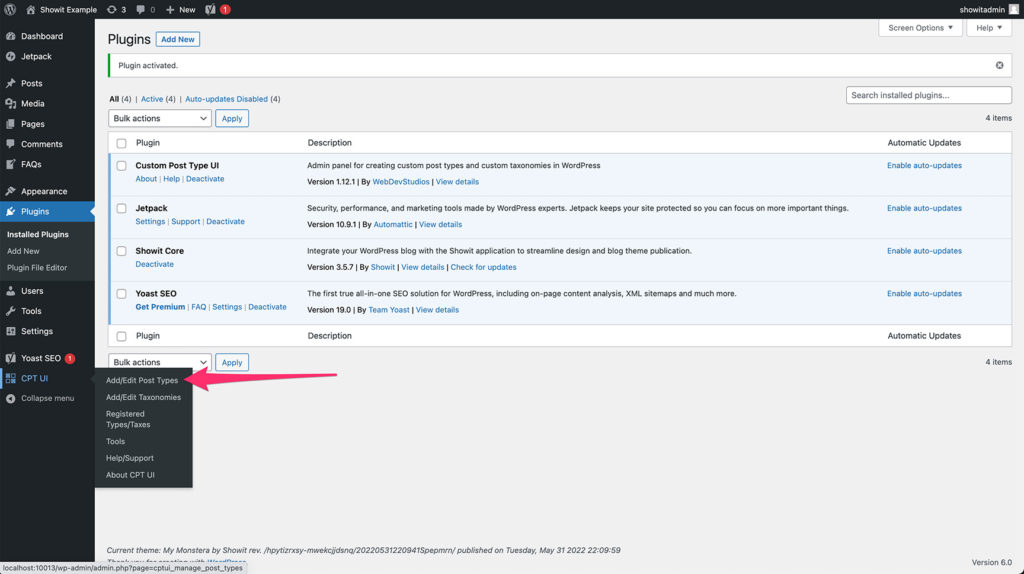
Scroll over the CPT UI link and then click on Add/Edit Post Types which should be the first option from that menu.
Don’t let this long list of options intimidate you. I hardly ever use most of these settings and I make Custom Post Types a lot.
First, we’re going to make a
- Slug
- Plural name
- Singular name
Let’s keep going with the About us page that has multiple team members displayed on it for this example.
For slug we’ll add team_members.
For the plural label, we’ll add “Team Members”
And for the singular label, we’ll add “Team Member”
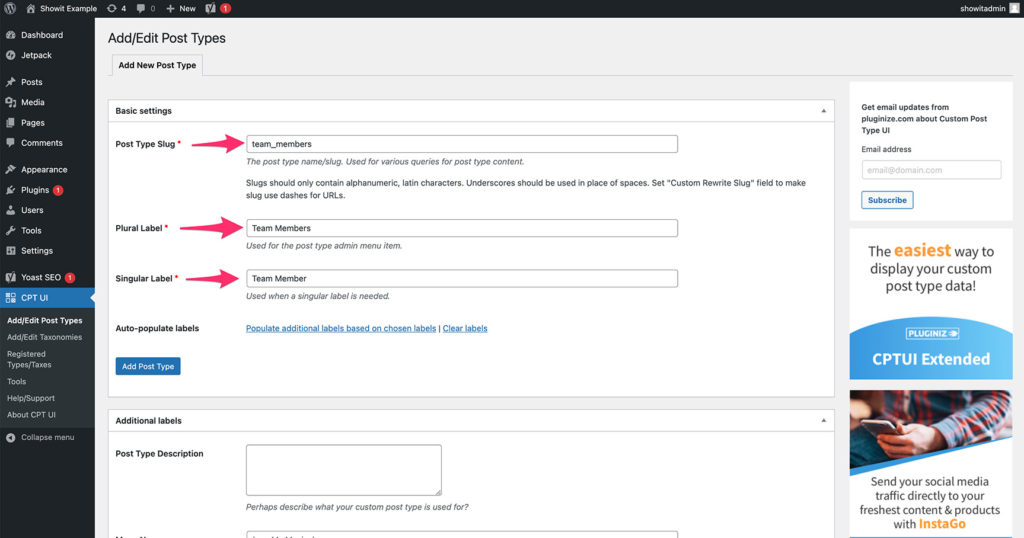
The plural name and singular name are pretty self-explanatory BUT if you’re not familiar with WordPress jargon Slug might seem a bit out of place.
The slug is used by WordPress to know what to look for any time you ask it to find a certain post type. You’ll notice that you’re not able to use capital letters AND any time you use the space bar it adds an underline character instead.
AND, don’t worry. CPT UI won’t allow you to add a slug that already exists. So, you won’t mess anything up.
3. Additional Settings for Your Showit Blog Custom Post Type
From there we are going to skip all of the options for the “Additional Label” options. In fact, if you want you can minimize that section altogether and get rid of some clutter.
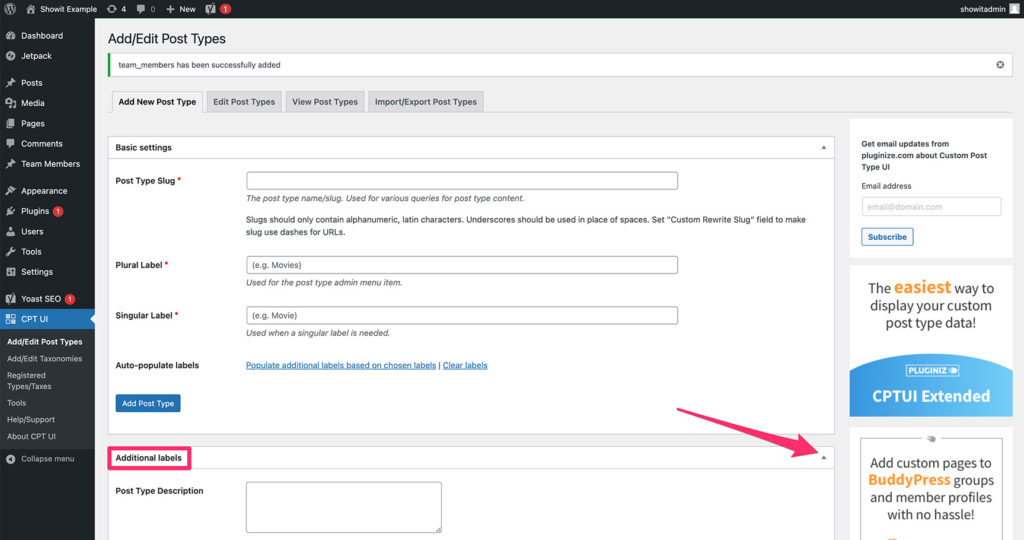
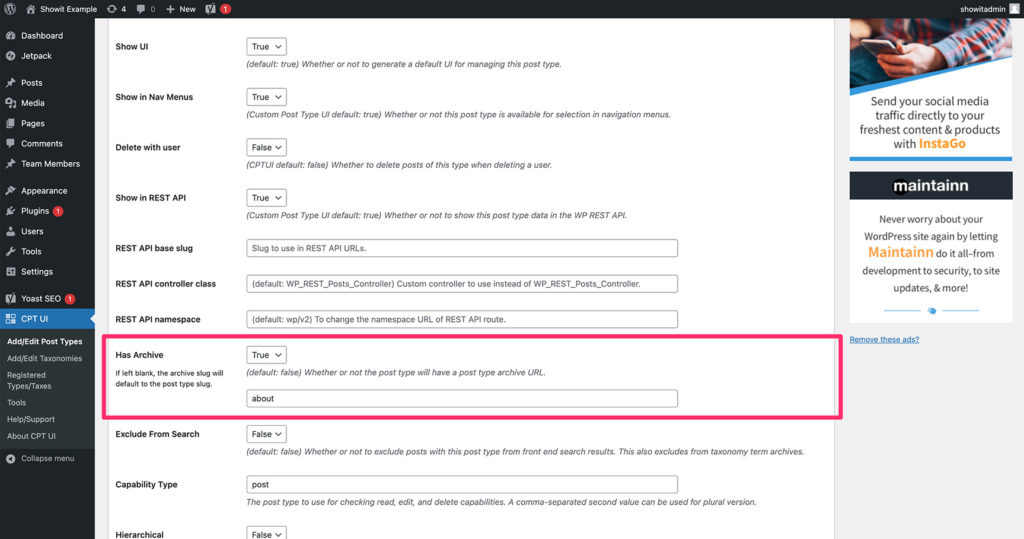
The next thing we want to mess with is the “Has Archive” setting. It’s about 10 steps down on the “Settings” section.
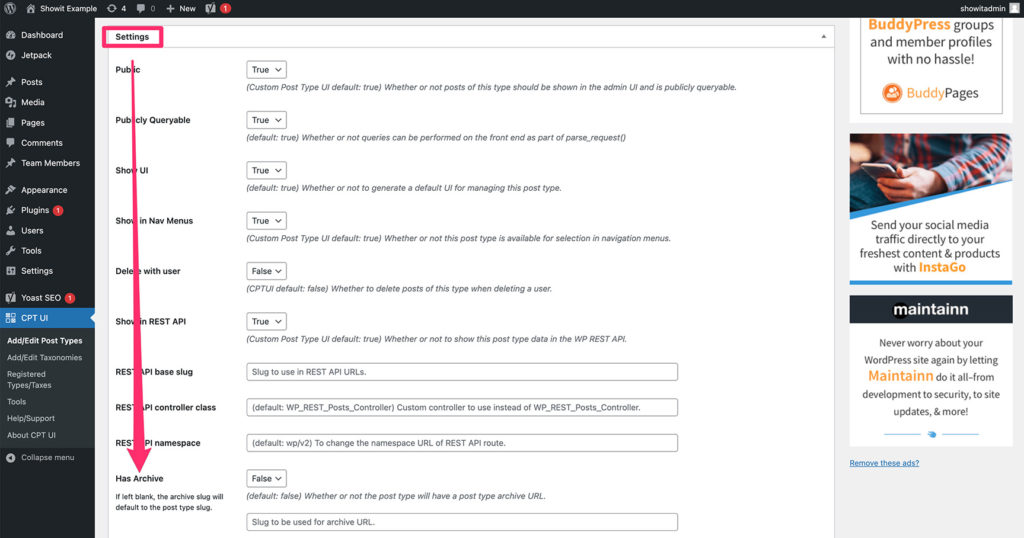
OR if you’re like me and don’t want to remember that every time you can just do a search on the page for “has archive” by hitting command + f on mac or control + f on a PC and it will highlight what you’re looking for.
Once you’ve found it, you’re gonna want to change the setting to “True” and then add what we want the url path to look like.
We are creating this post type for our “about” page. So, add “about” to that field. If not, the page defaults to mywebsite.com/archive-about which isn’t very fun to send people to.
Menu Icon
The last setting we are going to change is the menu icon that shows up in the WordPress dashboard. If you don’t change this it defaults to a boring ole pin.
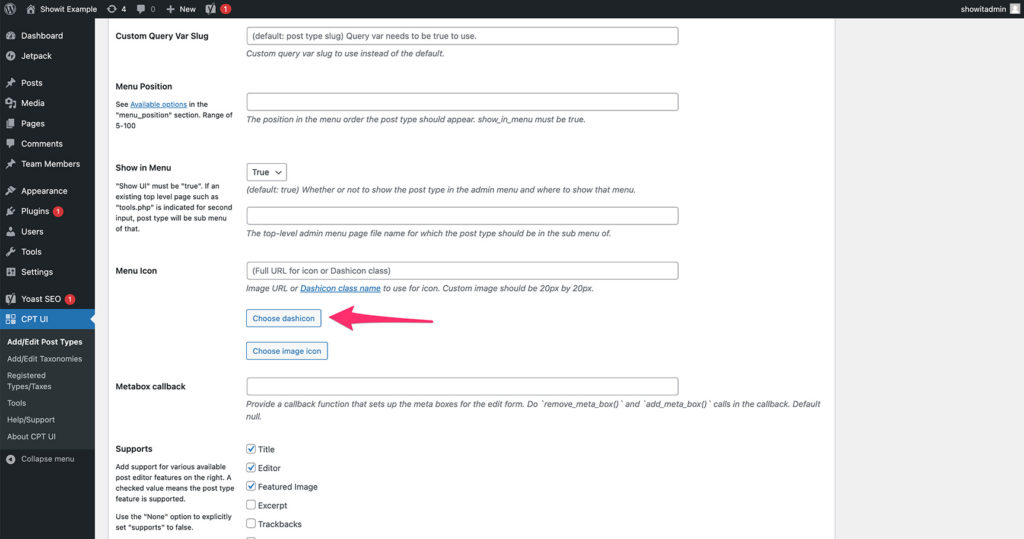
If you don’t care about the icon then don’t worry about changing it. You don’t have to be fun if you don’t want to. But, c’mon live a little!
Scroll down a bit to find it or use our search a find feature. Click on the “Choose Dash Icon” option and that will bring up a list of icons to choose from. We’re going to choose the one that looks like a bald businessman
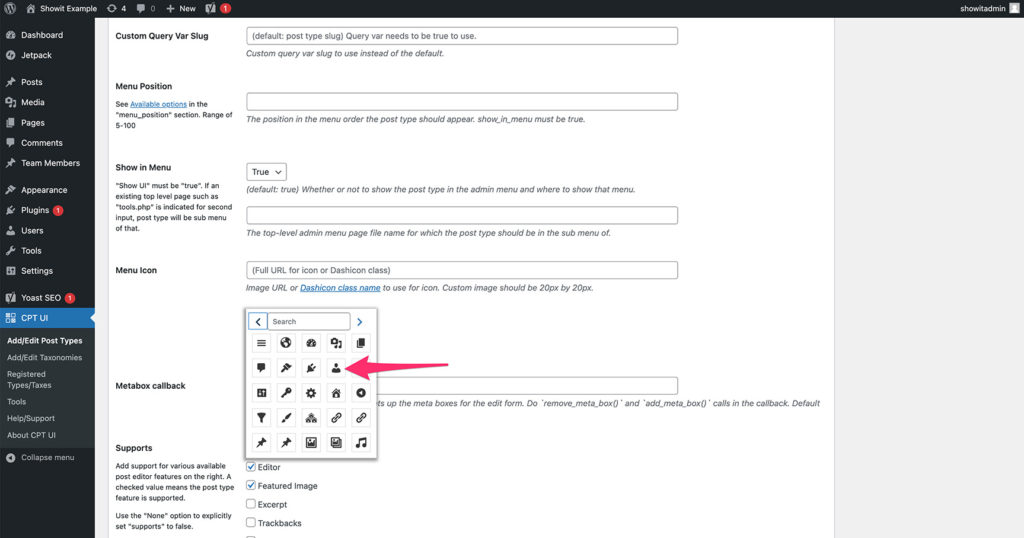
If you’d like to choose something else be my guest there are plenty of other options for whatever kind of post type you might be creating.
AND, we are officially done with the settings. Scroll all the way down and click the “Add Post Type” button.
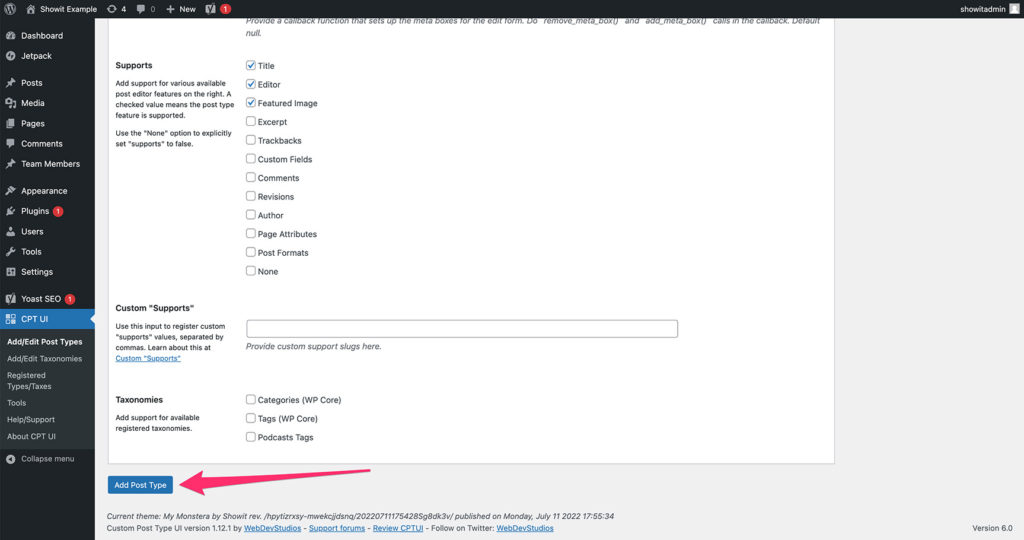
You should now be able to see your shiny new post type show up on your WordPress dashboard!
4. Add Posts to Your Custom Post Type in Showit
Now we’re going to add some posts to our new post type. This works just like adding a blog post does.
Click on the Team Members post type then click “Add New.” If you need help with that check out this webinar where I talk all about it.
Just like any blog post, you’ve got a title, a featured image, and some content.
We’ll also want to fill that out for all our team members except the:
- Title becomes their name
- Content becomes their job title
- Featured image becomes their headshot
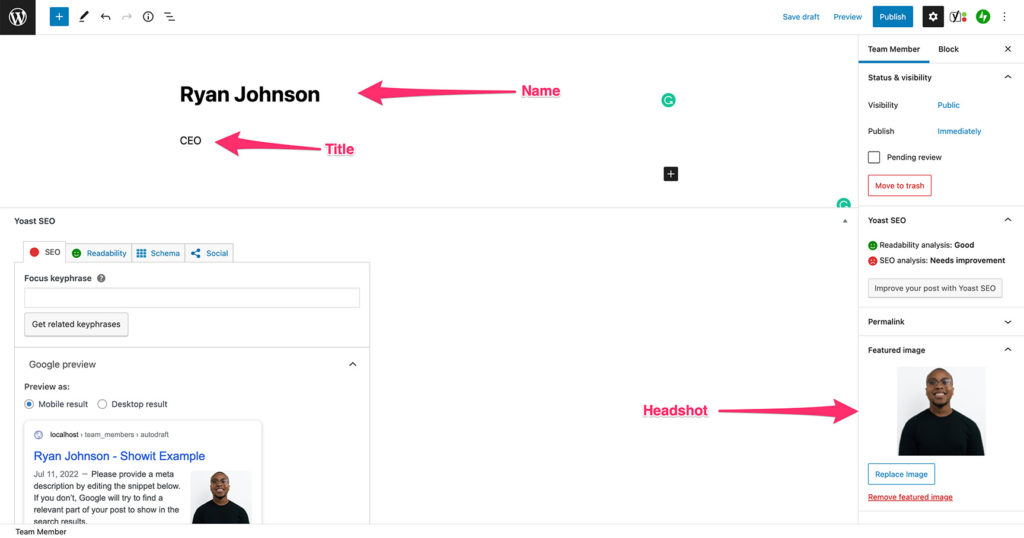
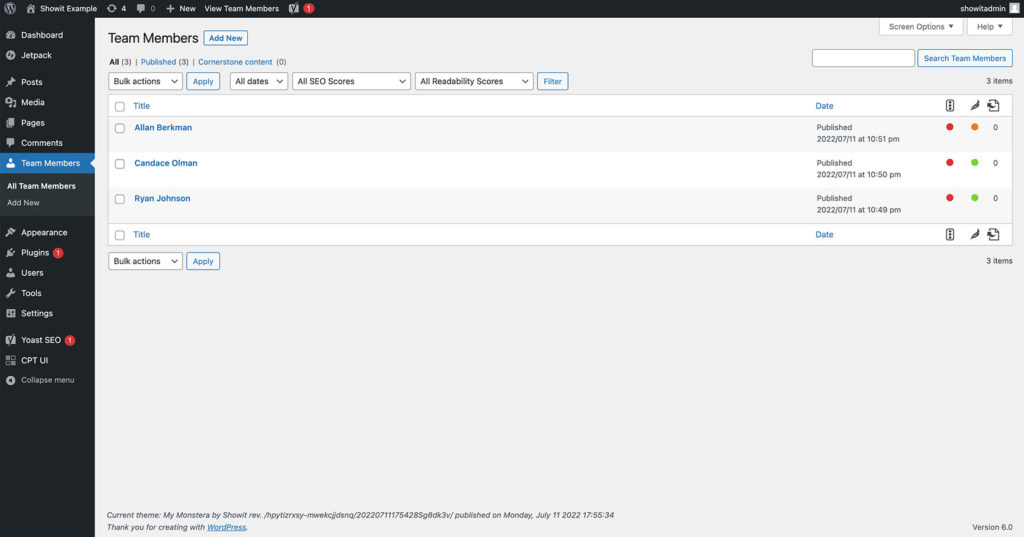
For fun, I’m going to add three fake employees so we can have something to work with.
5. Creating a Template for Your Custom Post Type in Showit
The last thing we need to do is set up a template for the post type in the Showit app. I’m using the free “Monstera” template. BUT, you can use whatever your site was built with.
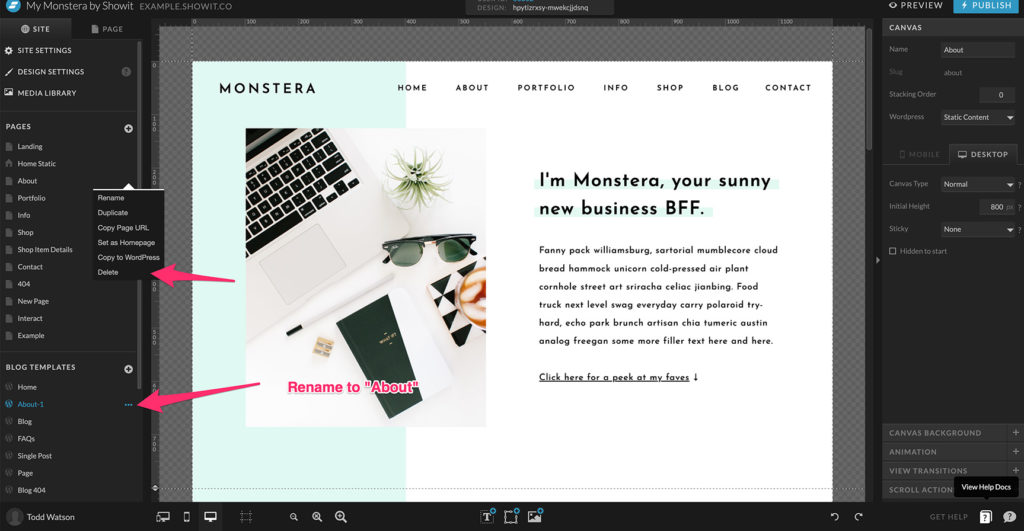
Thankfully, the Monstera template has an about page already built. BUT, we need to turn it into a WordPress page.
All you have to do is select the ellipsis next to the About page link in the site settings. Then select “Copy to WordPress.”
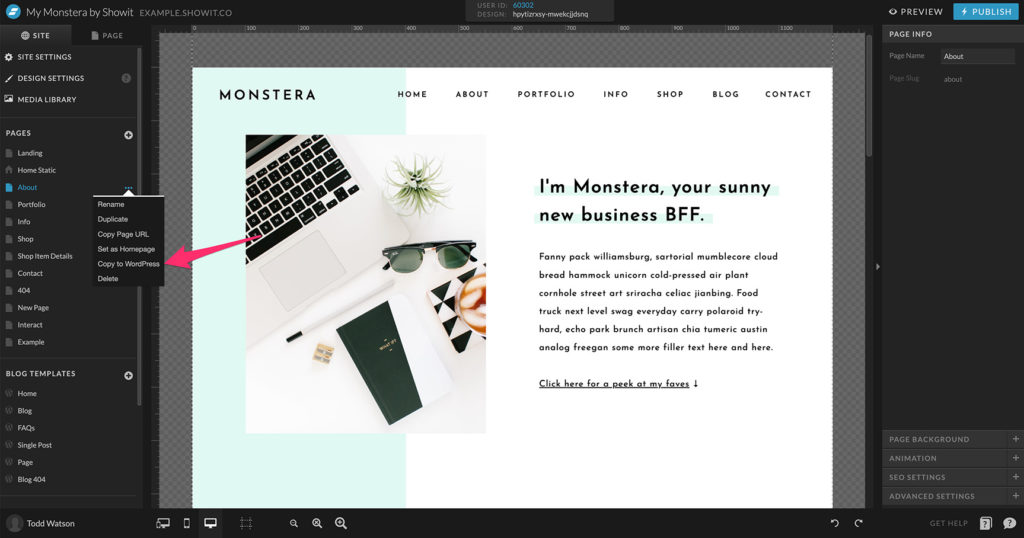
Next, we want to delete the old about page and rename the new one to just “About.” You can’t have two pages with the same name on Showit. SO, when you copied the About page to WordPress it made its name About-1.
Change the Custom Template Setting in Showit
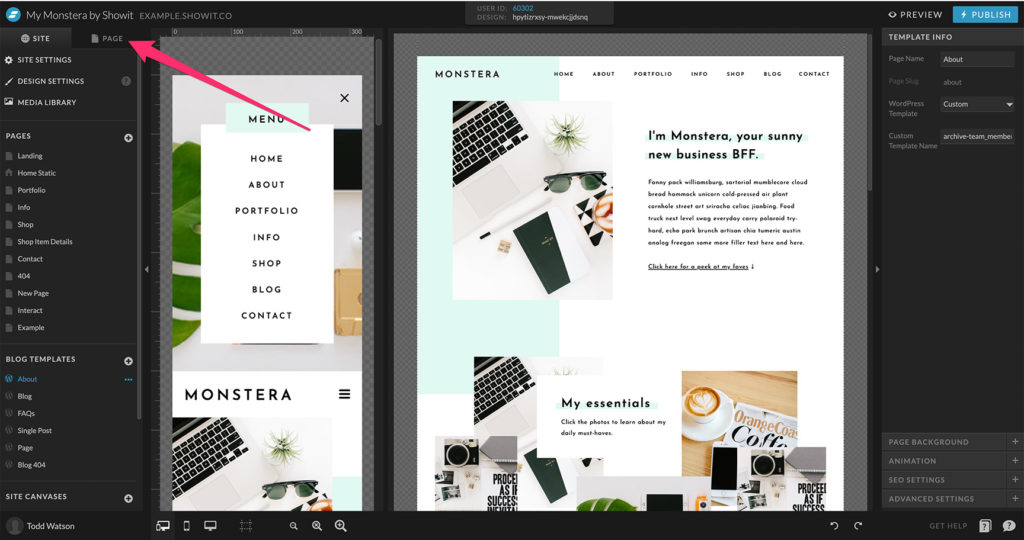
Next, we want to change some settings in the Template Info options on our page. If you’re unfamiliar with how to get there:
With the page you want selected, click the Page tab at the top of the screen:
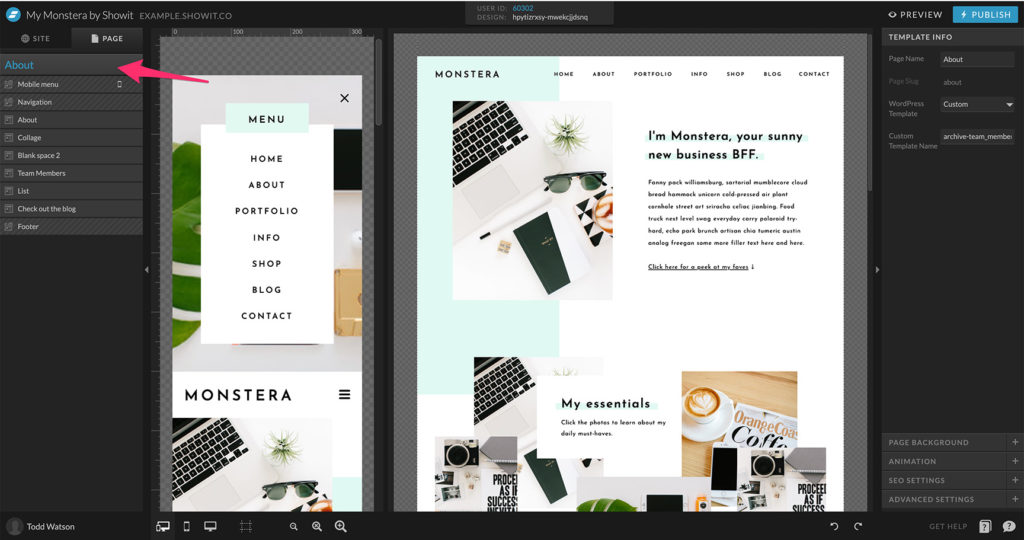
Then click the layer panel header above all the page canvases:
AND NOW, you should be able to see the Template Info option on the right. We are going to change this to the “Custom” option then in the “Custom Template Name” we’re going to add archive-team_members:
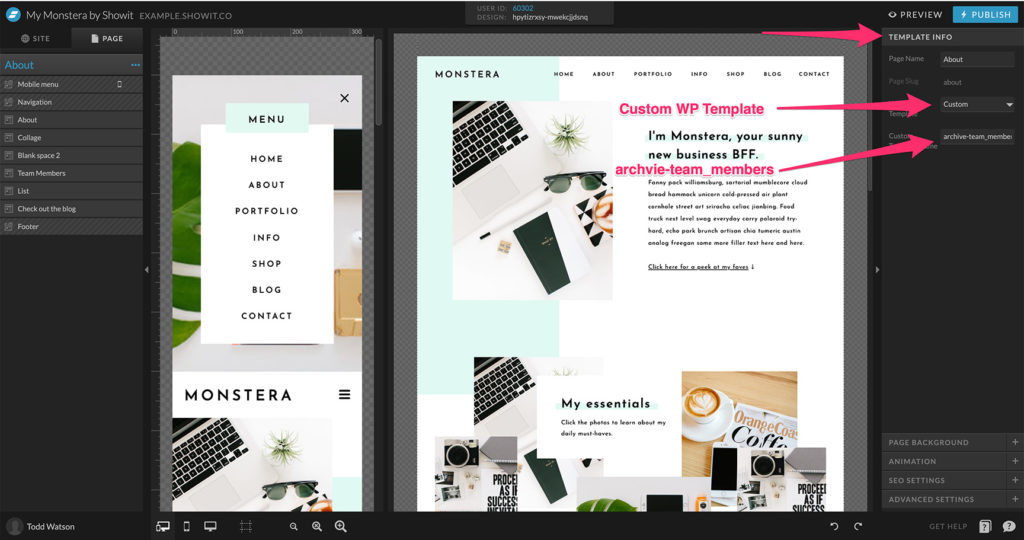
That might change for you depending on what you named your slug on the custom post type. So, for instance, if you named your slug “podcast” then that would become archive-podcast.
What’s Happening Behind the Scenes
If you’re someone like me, you’re probably saying something like, “Cool, but how does this work?”
Answer: magic.
JK.
If you’re not the type that needs to know this stuff, move along to the next step to finish up. It will work whether you understand it or not.
BUT, if you need to know, WordPress has a system called “Template Hierarchy.” That’s honestly just a fancy way of saying “look for these files if it’s this type of post type.”
There are a lot of options here that make Custom Post Types SUPER HELPFUL in a lot of situations which we’ll likely discuss in the future. BUT, for now, just know that archive-[your slug name] will be what WP looks for whenever you’re trying to make a list of a specific type of custom post types.
6. Add a WordPress Canvas in Showit
Now, We’ve got to set up a Canvas on the page so that is connected to WordPress.
Add a blank canvas on that About page. Then move it right under the “Blank Space” canvas and rename it to “Team Members.”
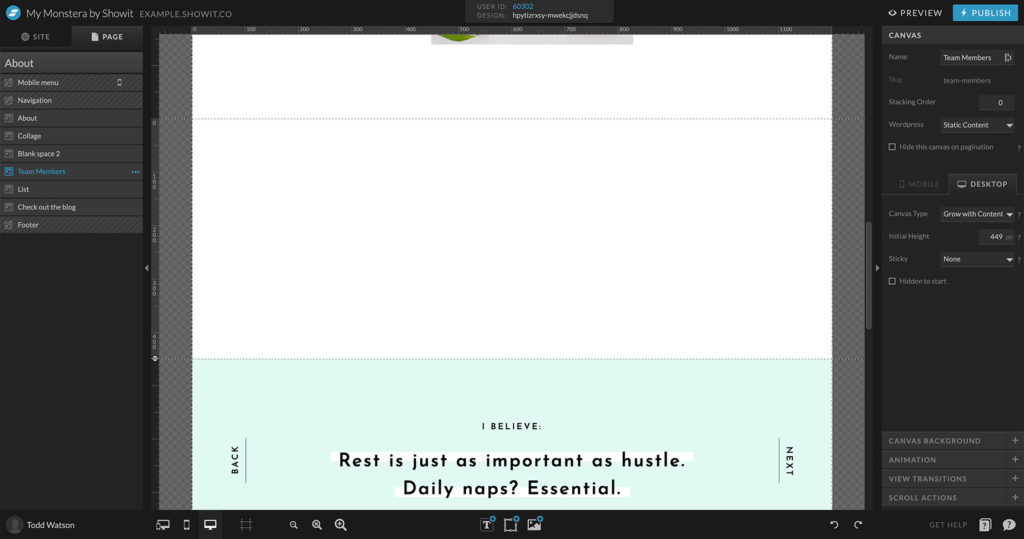
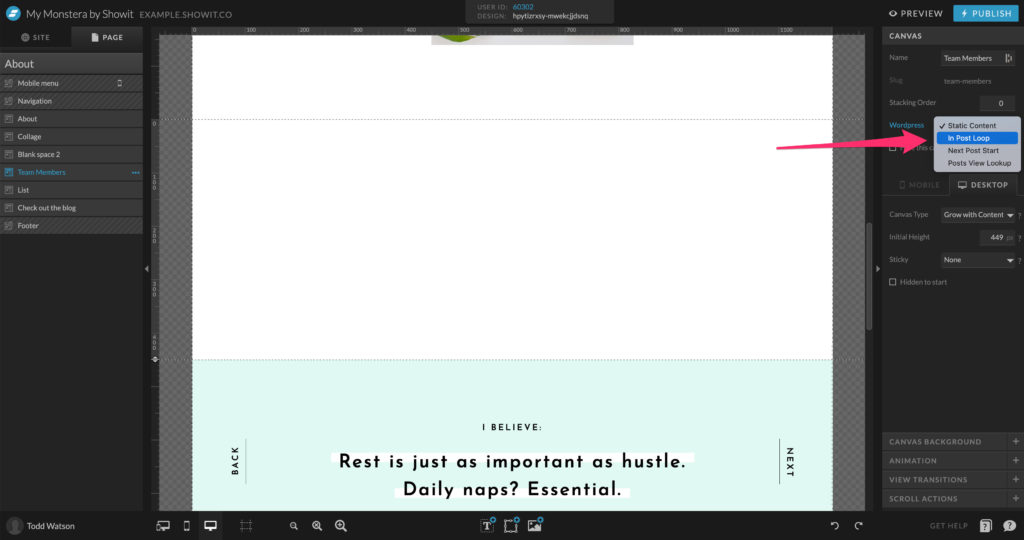
Now, we need to tell Showit that this in fact in the WordPress loop. To do that, make sure you don’t have any elements selected then click on the canvas tab on the right.
In the WordPress option select “In Post Loop.”
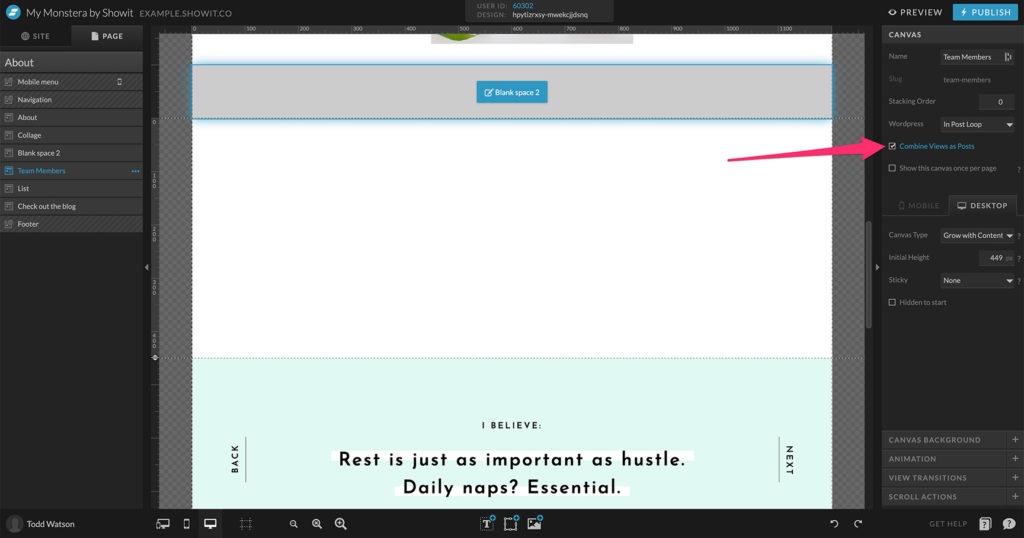
Then, select the tick box that says, “Combine Views as Posts.”
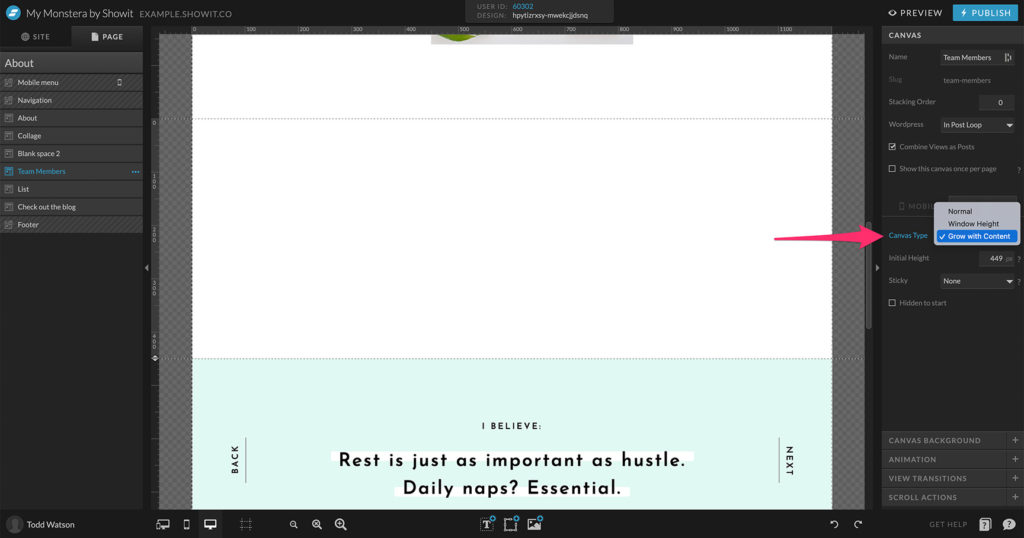
Finally, we need to make sure that as more posts or added or taken away this canvas gets bigger or smaller. To do that we select “Grow with Content” on the canvas type.
7. Adding Your Content So Your Custom Posts Show Up
Last big step! Are you still with me? Do you need a dance break?

We are close to the finish line, my friends.
Now, it’s time to set up how the posts that will be pulled in are going to look. I’m going to keep it pretty simple.
I’ll add a subheading for the name, a placeholder image for the headshot and paragraph text for the title.
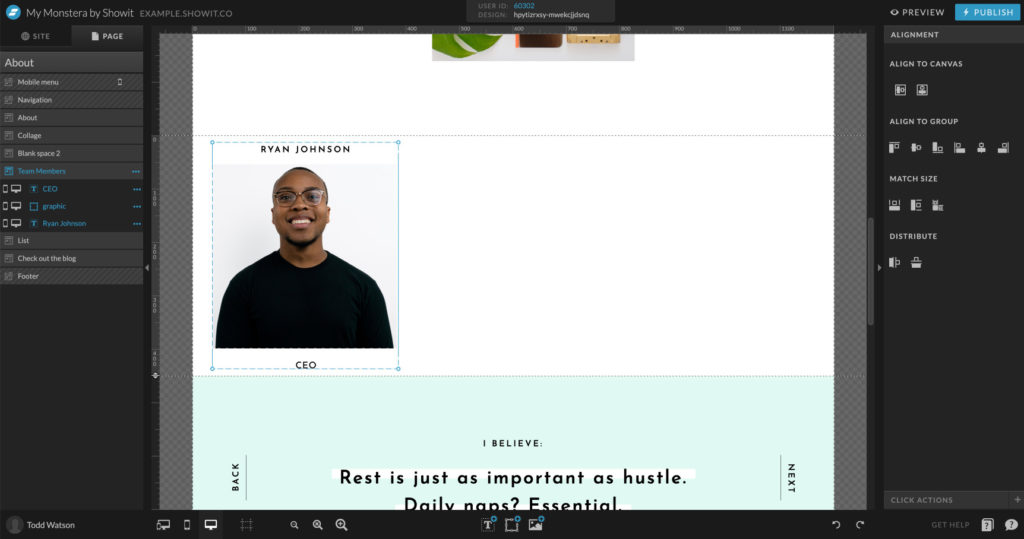
Now, the key is telling Showit what content from WordPress should replace the content on the canvas. To do that, select an element on the canvas and a “Text Properties” tab should show up on the far right.
Select that and you should see something that says “WordPress” with “Placeholder” right underneath.
Just select the dropdown and choose which WordPress content Showit should look for.
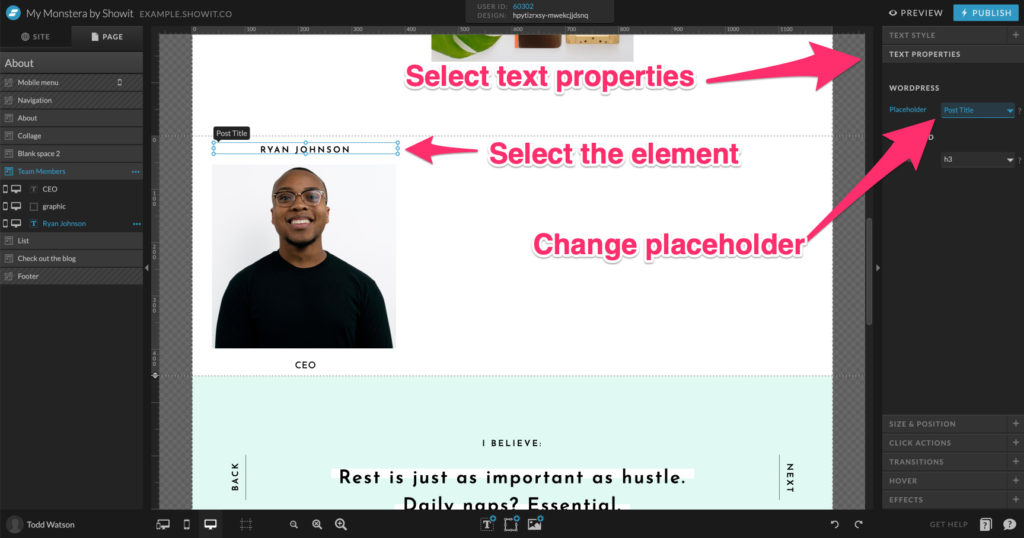
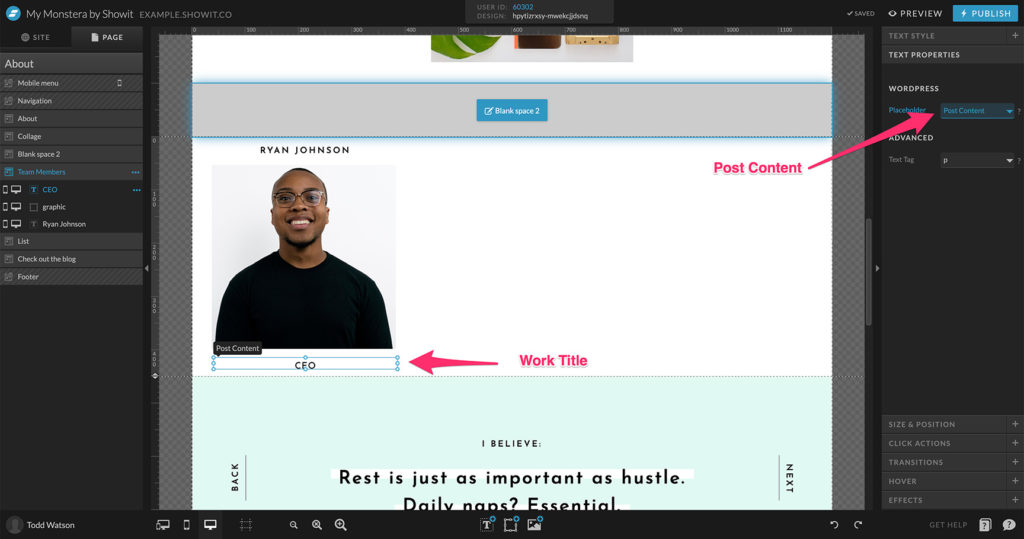
In our instance, the name should be replaced by the “post title,” and the work position or work title should be replaced by the “post content.”
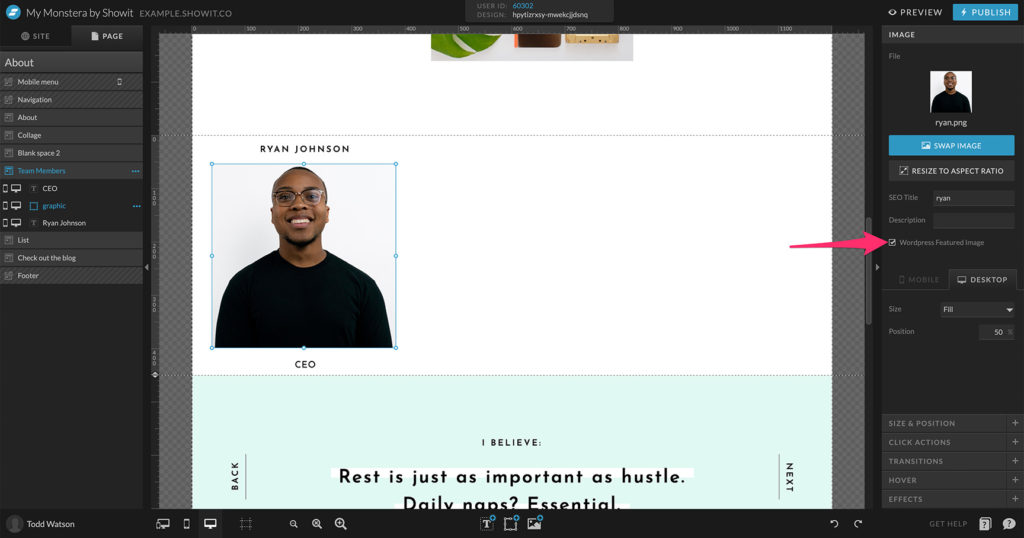
The only one that is slightly different is the image. Select the image and on the very first tab on the panel to the right you should see “Image.”
Make sure that’s selected and then check the “WordPress Featured Image” right underneath the description:
If you like the way it all looks we need to copy and paste that 3 more times. Again, it doesn’t need to be different. This is just placeholder stuff. WordPress is going to change it all out according to our posts in the custom post type.
Once you’ve got everything laid out the way you want, you just need to add Canvas Views and place everything in there. Since we have 3 separate team members, we’ll need to make 3 canvas views.
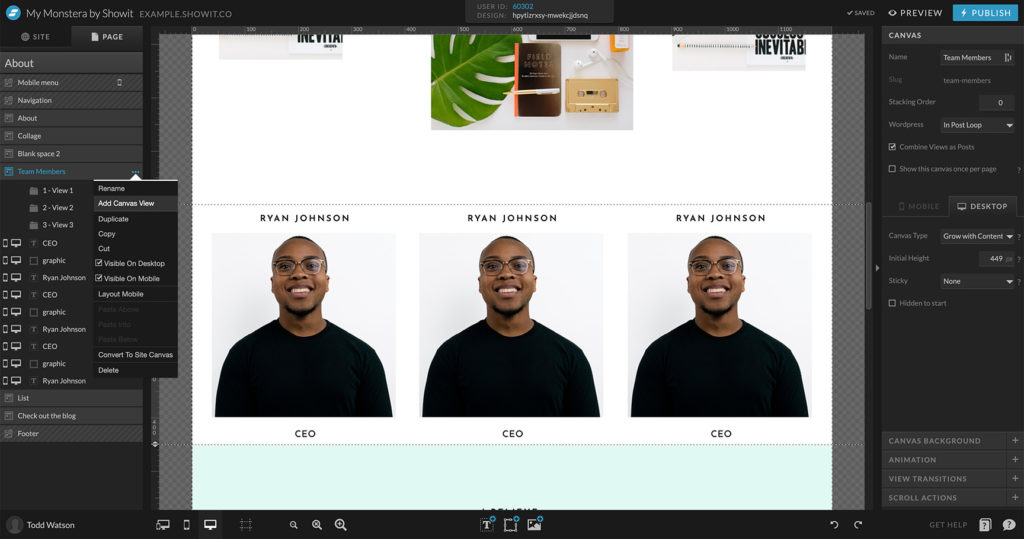
When it’s all said and done your canvas should look something like this:
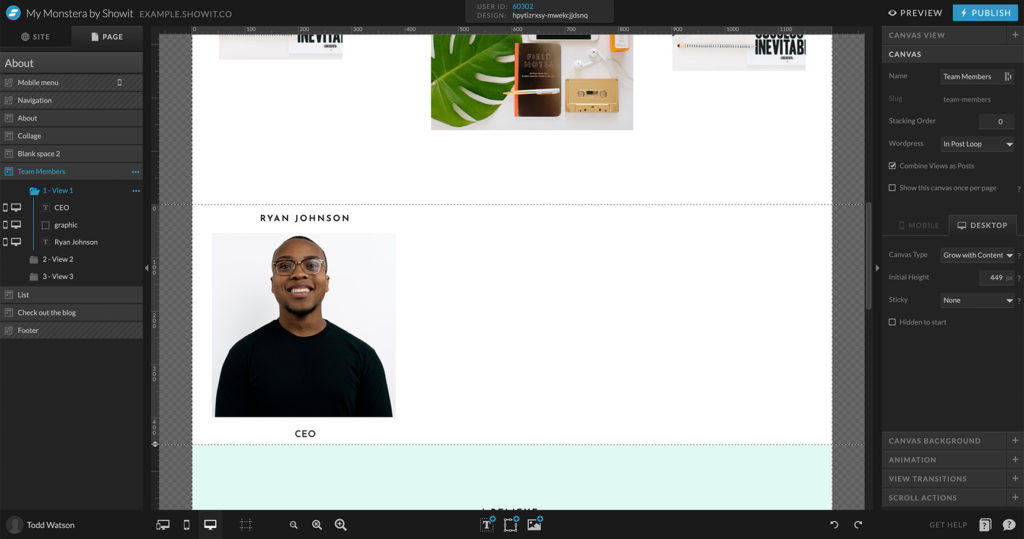
If you want to you can add a title to the section BUT make sure it’s not on the same canvas as the posts are. Why? Because if you ever have more posts than canvas views the canvas will repeat itself.
So, you’ll end up seeing the title repeated each time the canvas is repeated. So, for our example, if we had 4 team members add to the team members posts in WordPress you’d see that title twice.
Point is…put it on a different canvas 😉
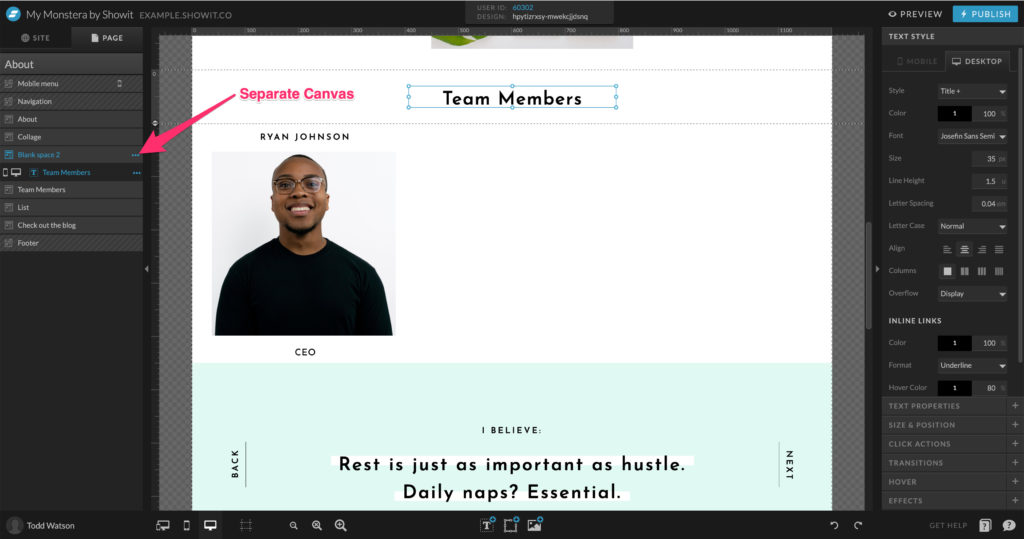
All that’s left to do is hit publish and fire this puppy up on the site to see how it looks!
And, would you look at that! Just like magic, your Team Member posts show up on the About page.
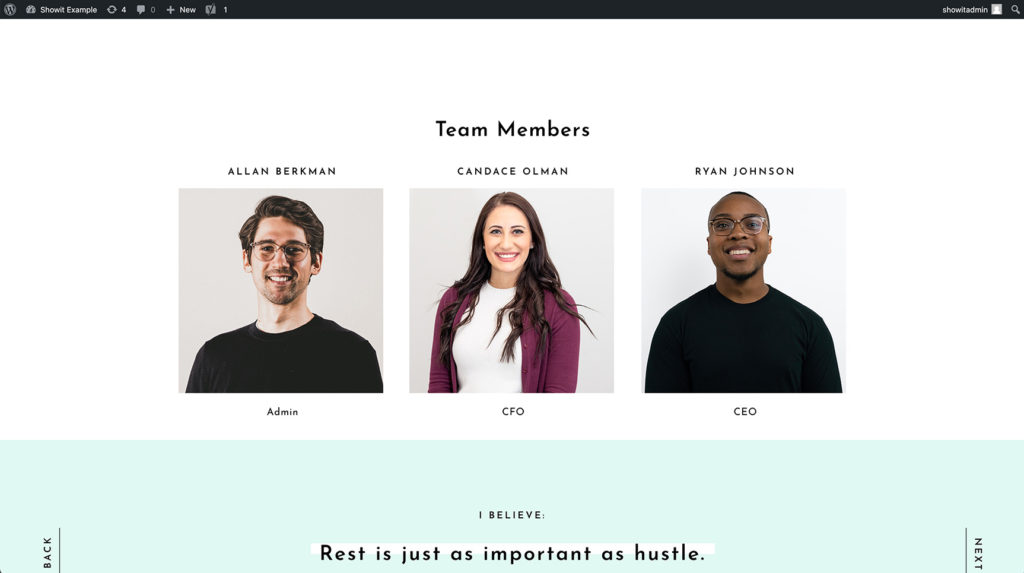
Now whenever a team member comes or goes you don’t have to spend tons of time rearranging all the elements on a canvas 🙂
8. BONUS: Reordering the post
You might have noticed that our post here aren’t ordered great. Typically the CEO would be the first person you’d see on a list of team members.
The reason for that is that the order your posts are in on WordPress will be the order they’re displayed on the page. That’s just like the regular WordPress blog posts works.
SO, what if you want to change the order?
There are a few great plugins that allow you to drag and drop the order fairly easily. My favorite is Simple Custom Post Order.
You do have to turn the ability to drag and drop custom post types order on PER CUSTOM POST TYPE in the settings. BUT, it’s fairly easy to do.
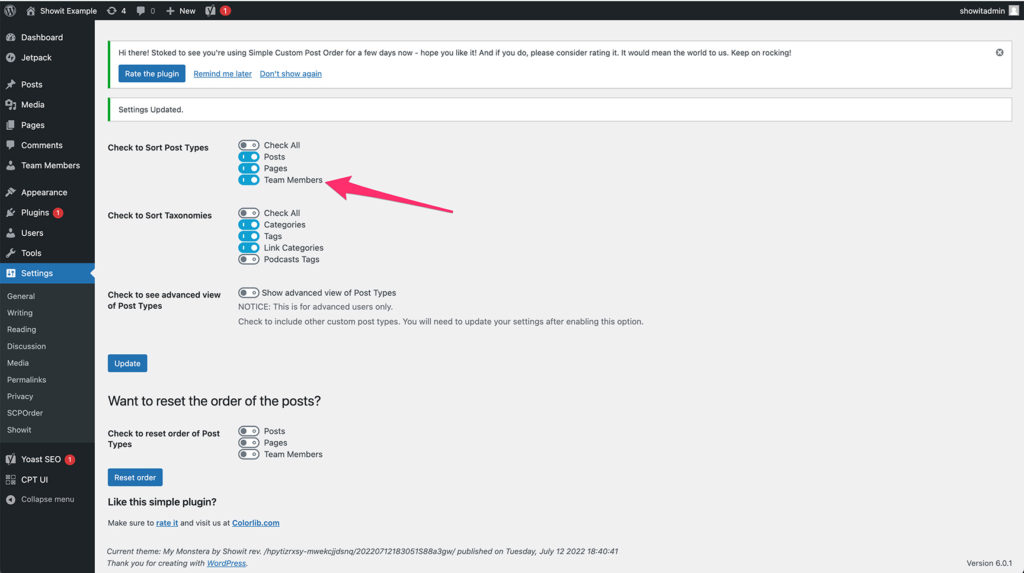
Then you just drag the post in the order you want them to display.
The Joy of Adding Custom Post Types to Your Showit Site
Hopefully, by now you’ve caught the excitement of adding custom post types to your showit site. You can save yourself so much time AND use the feature in really fun ways.
So, take some time and get familiar with how you can implement it into either your site OR a site you’re working on for a customer.
It might take some time BUT I guarantee you that learning how to build custom post types on your Showit blog will be worth its weight in gold one day.

Chris is multitalented, being able to play a number of instruments, and having an inclination towards creative design, AND technical know-how. He cheerfully brings his Swiss army knife of skills to our designer community.
