Load Newsreader Bold Font
Okay, I'll admit it.
I am basically the most technically incompetent person EVER. I know as a photographer, I'm supposed to be skilled in these areas, but the truth is… I have no idea what I'm talking about.
For all of my technical problems, I hit up fellow Showiteer Yasmeen Rashed. She's a genuis, you guys, like a real life techie goddess- so hit her up if you have any technical stuff you need solved. When she came to me and told me that I could target my website traffic with Facebook marketing campaigns, two things happened.
First-I stared at her like she had suddenly sprouted two heads.
Second- I got really excited and started acting like Olaf from Frozen. “Yes- but how? Okay- but HOW?”
In order to make sure that truly ANYONE could implement this into their business- I decided to interview Yasmeen and have her walk me through the process, because if I can do it, a well trained monkey can do it. Here's how it went down.
Stephanie: First of all: what is this thing called?
Yasmeen: It's called a Custom Audience Pixel- it allows you to track audiences from your website so that you can find other people like the people who visit your website.
S: That sounds freakin' awesome. So- for a technically inept person like me, who even never had electricity until the age of 17… what does this mean? Explain it to me like I'm five.
Y: This is basically a new way to reach your customers on Facebook. You can reach people who have already visited your website, re-engage them for top-of-mind awareness, and advertise to them with more relevant marketing. For example, if you have a +Site that is promoting say, family portrait services or boudoir, you may not want to target the people that have come to your main Showit wedding site with family or boudoir advertising, but you can specifically target the people who come to +Sites with a relevant promotion.
Let's simplify it further. You can do custom targeted marketing on Facebook to people who have already been to your website, and looked at SPECIFIC, relevant content. Boudoir advertising to boudoir visitors, and family portrait marketing to your family content visitors.
S: Whoa. Mind. Blown. Thanks for the simplification! I needed it.
Y: Now let me blow your mind further. Now that you have information who are visiting your website, you can target people who “look like” them on Facebook- and I don't mean their profile photos on Facebook. I'm talking about similar interests. Even if someone hasn't been to your Facebook page before, you can still target them.
Say your ideal client “Jane” has been to your website, checked out your stuff and maybe even booked you. By using this custom audience from Facebook, you can now find “Jane lookalikes” who have similar interests- and who are in the same age group, region, etc.
[pullquote]
The purpose of having a custom audience on Facebook is to hone in on your exact client. [/pullquote]
If you specialize only in weddings, and have already photographed a bunch of people and have nothing left to follow up with, and you want to exclude them from upcoming wedding promotions and save your Facebook advertising dollars, then you can do that. If you have a Client Lounge in Showit for your past and active clients, then you can exclude those users from your new client advertising.
S: This all sounds easy- and that scares me. How do we set it up?
Y: There are two things that you need to have. One, you need to have Google Chrome, because this won't work in any other browser. Second, you need to have a Showit site to follow these instructions.
- Launch Chrome- and sign into Facebook in that browser. Go to the Facebook Power Editor: https://www.facebook.com/ads/manage/powereditor/
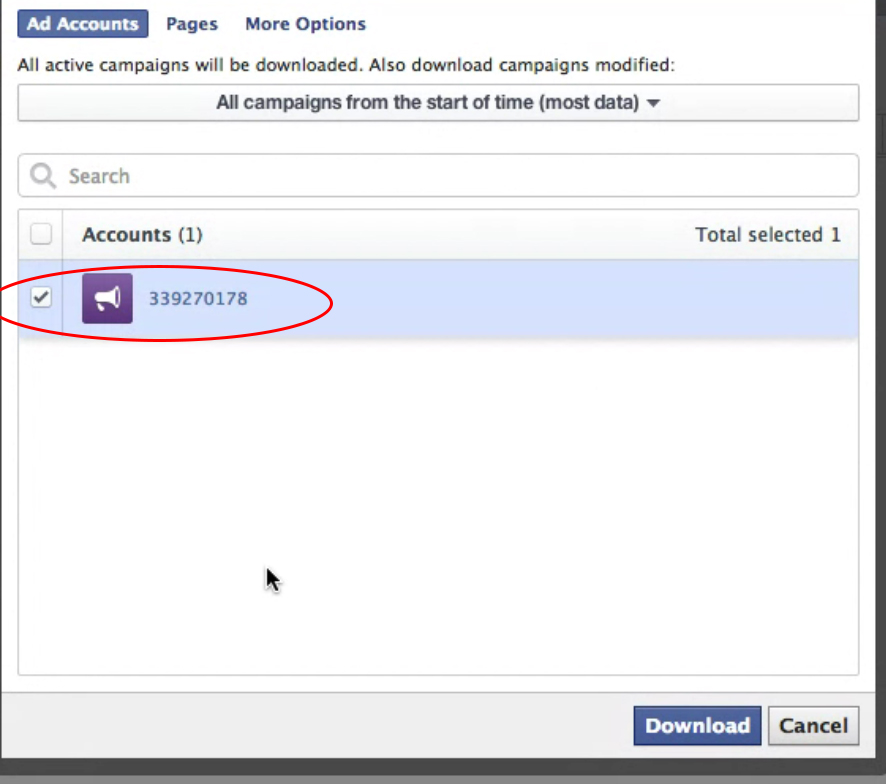
- Choose the Facebook page you want to work in- your main business page. Click the “Download to Power Editor” button. That basically allows you to work on that account within the editor.
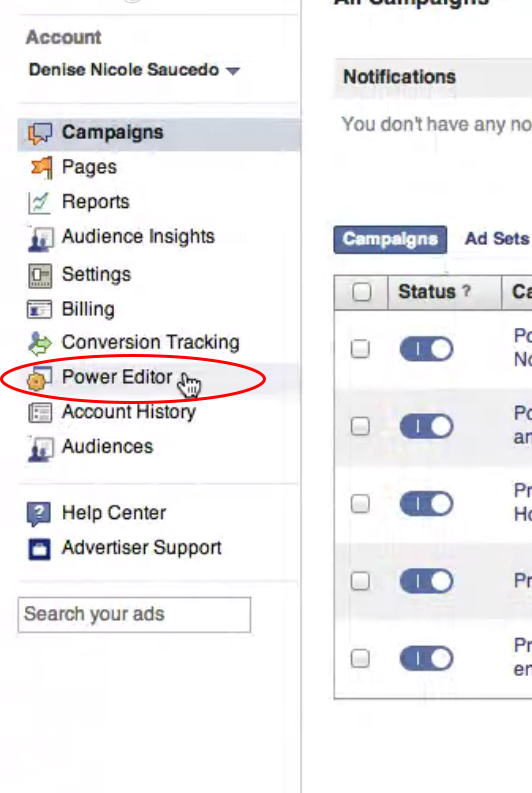
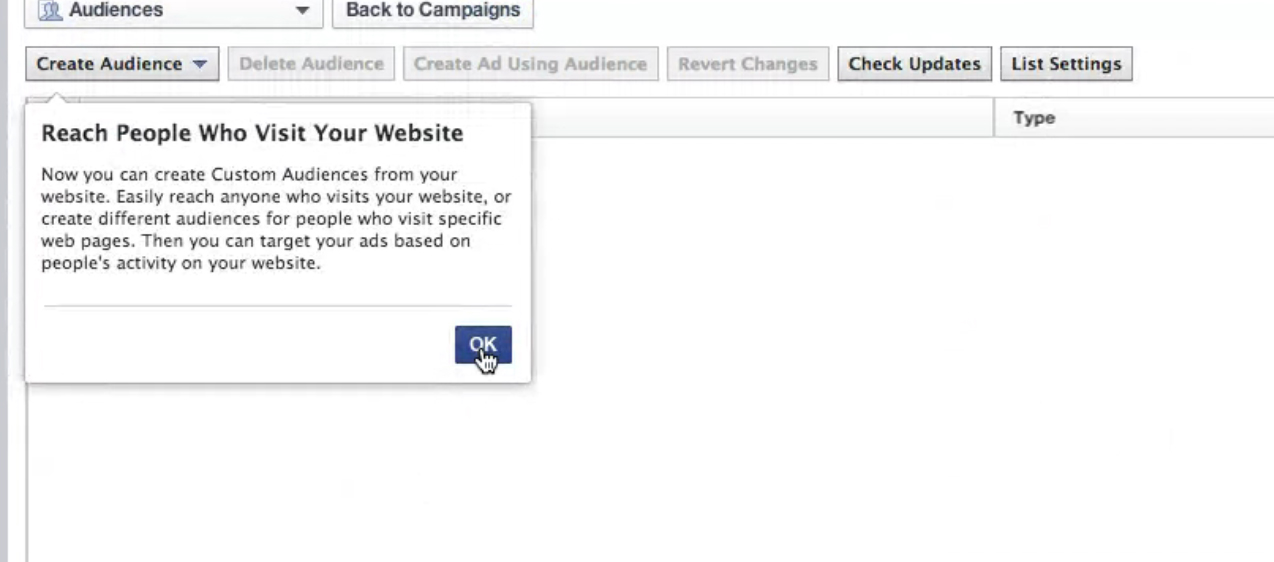
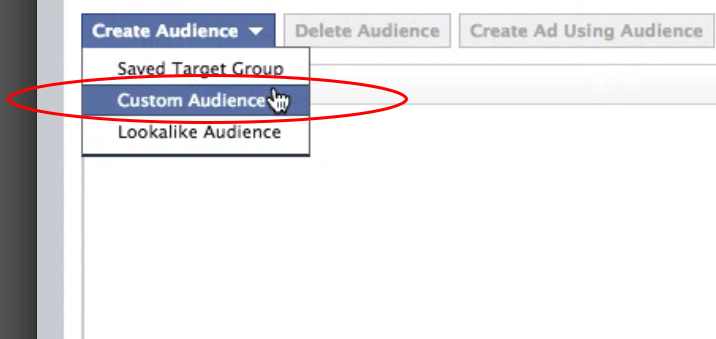
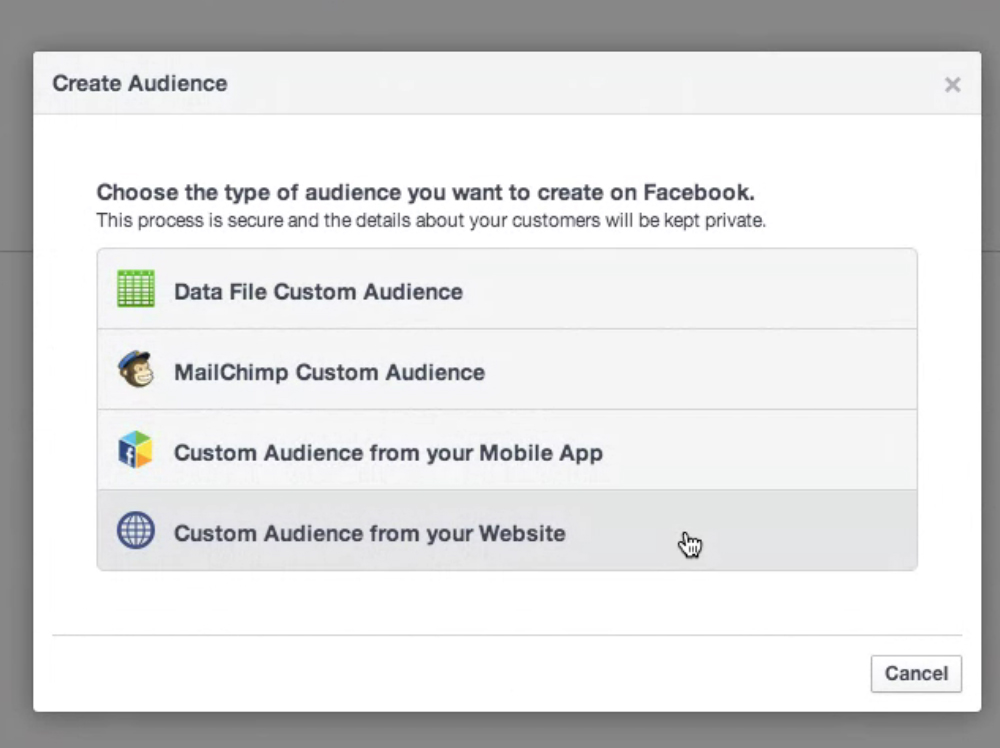
- In the left pane, you will see a drop down button at the top that shows you your campaigns and ad sets- click “Choose Audiences.” Click “Create Audience,” and choose “Custom Audience from your Website.”
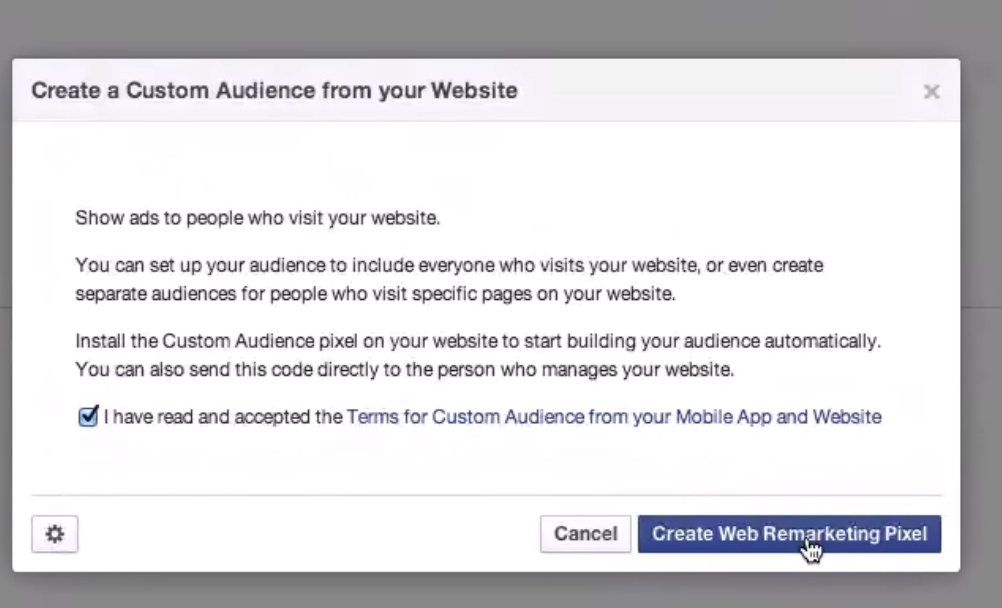
This is where you will be asked to agree to the terms of service- and you want to do that. Click accept, and then “Create Audience.”
- You can give your audience a name- if you're trying to capture ALL of your website visitors, you can call it something like “ALL VISITORS,” or if you're targeting a specific group like a Boudoir +Site, you can call it “Boudoir Visitors” or whatever. Then you target your website traffic- so you can choose all visitors, or people visiting specific pages. In this example, we're going to choose all website visitors.
You are then asked for the number of days you can save this information for. Facebook only tracks the custom audience for a certain number of days. The default is 30 days, the maximum is 180. Choose the time frame that you'd like to track your audience, and then click “Create.”
-
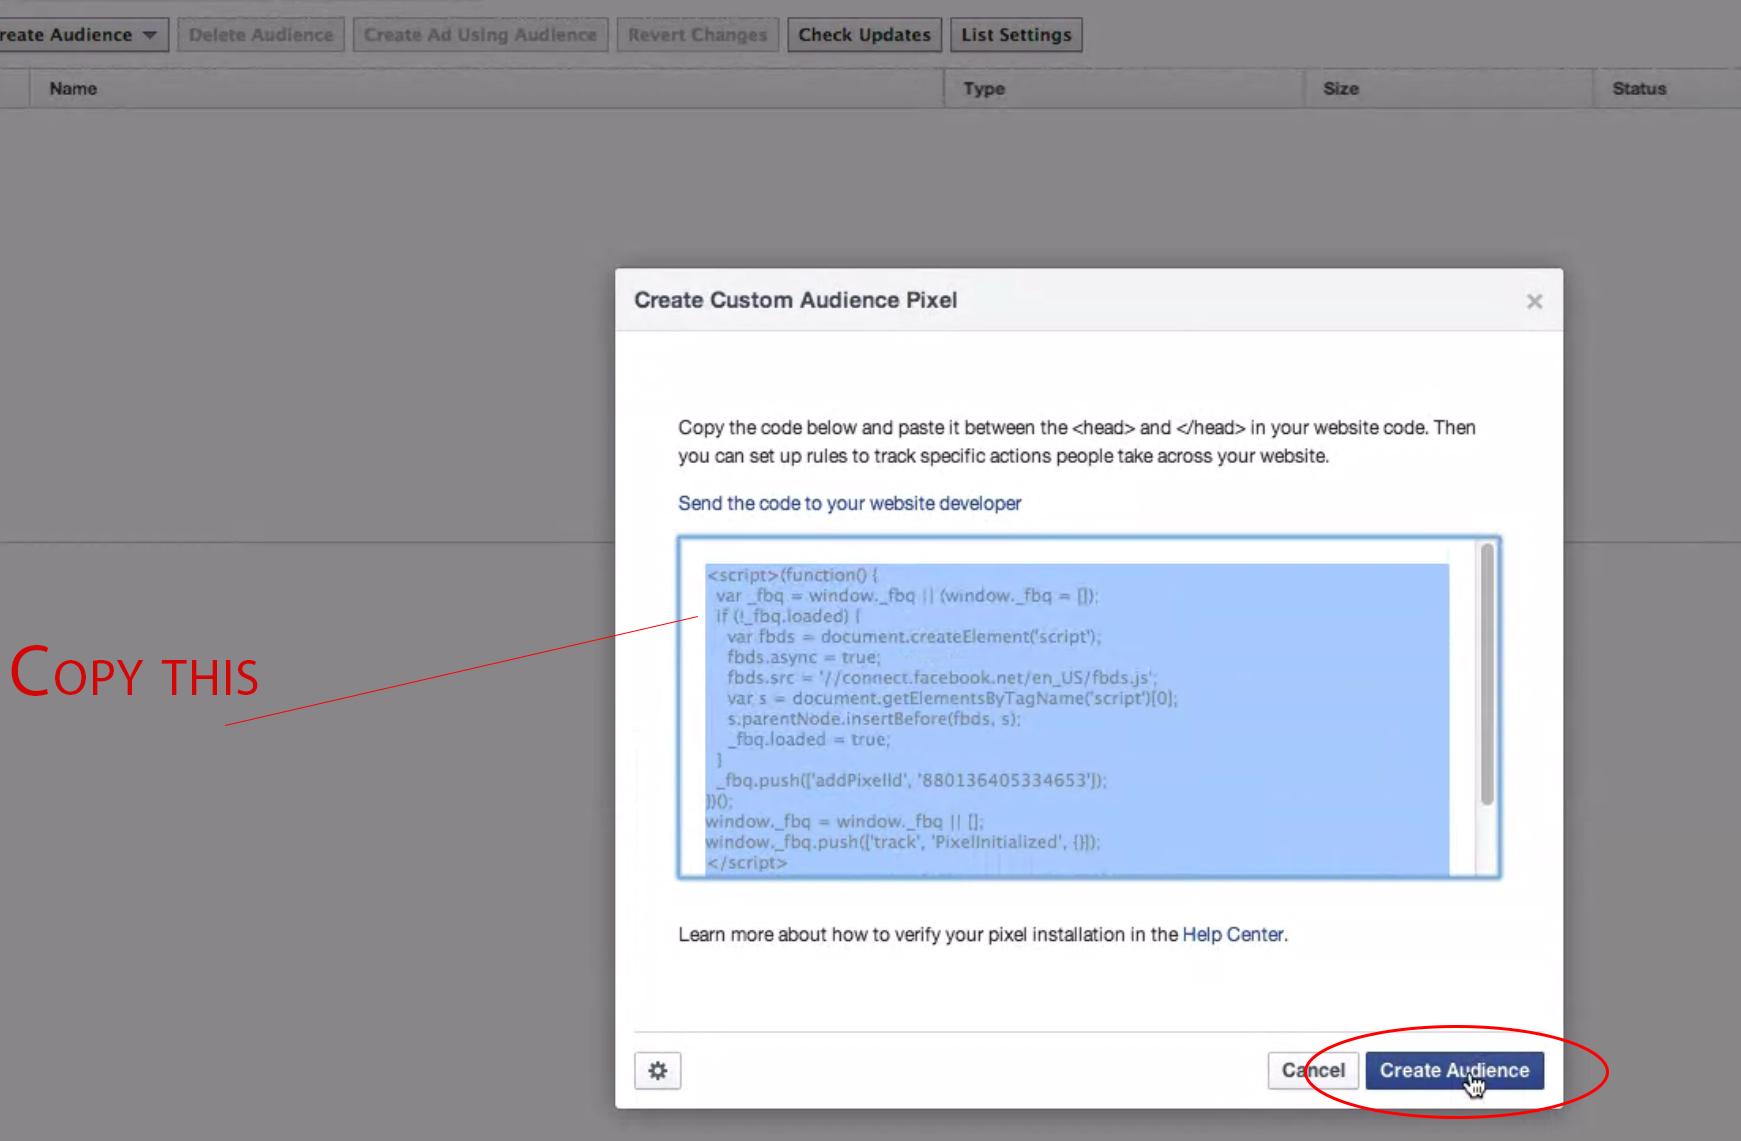
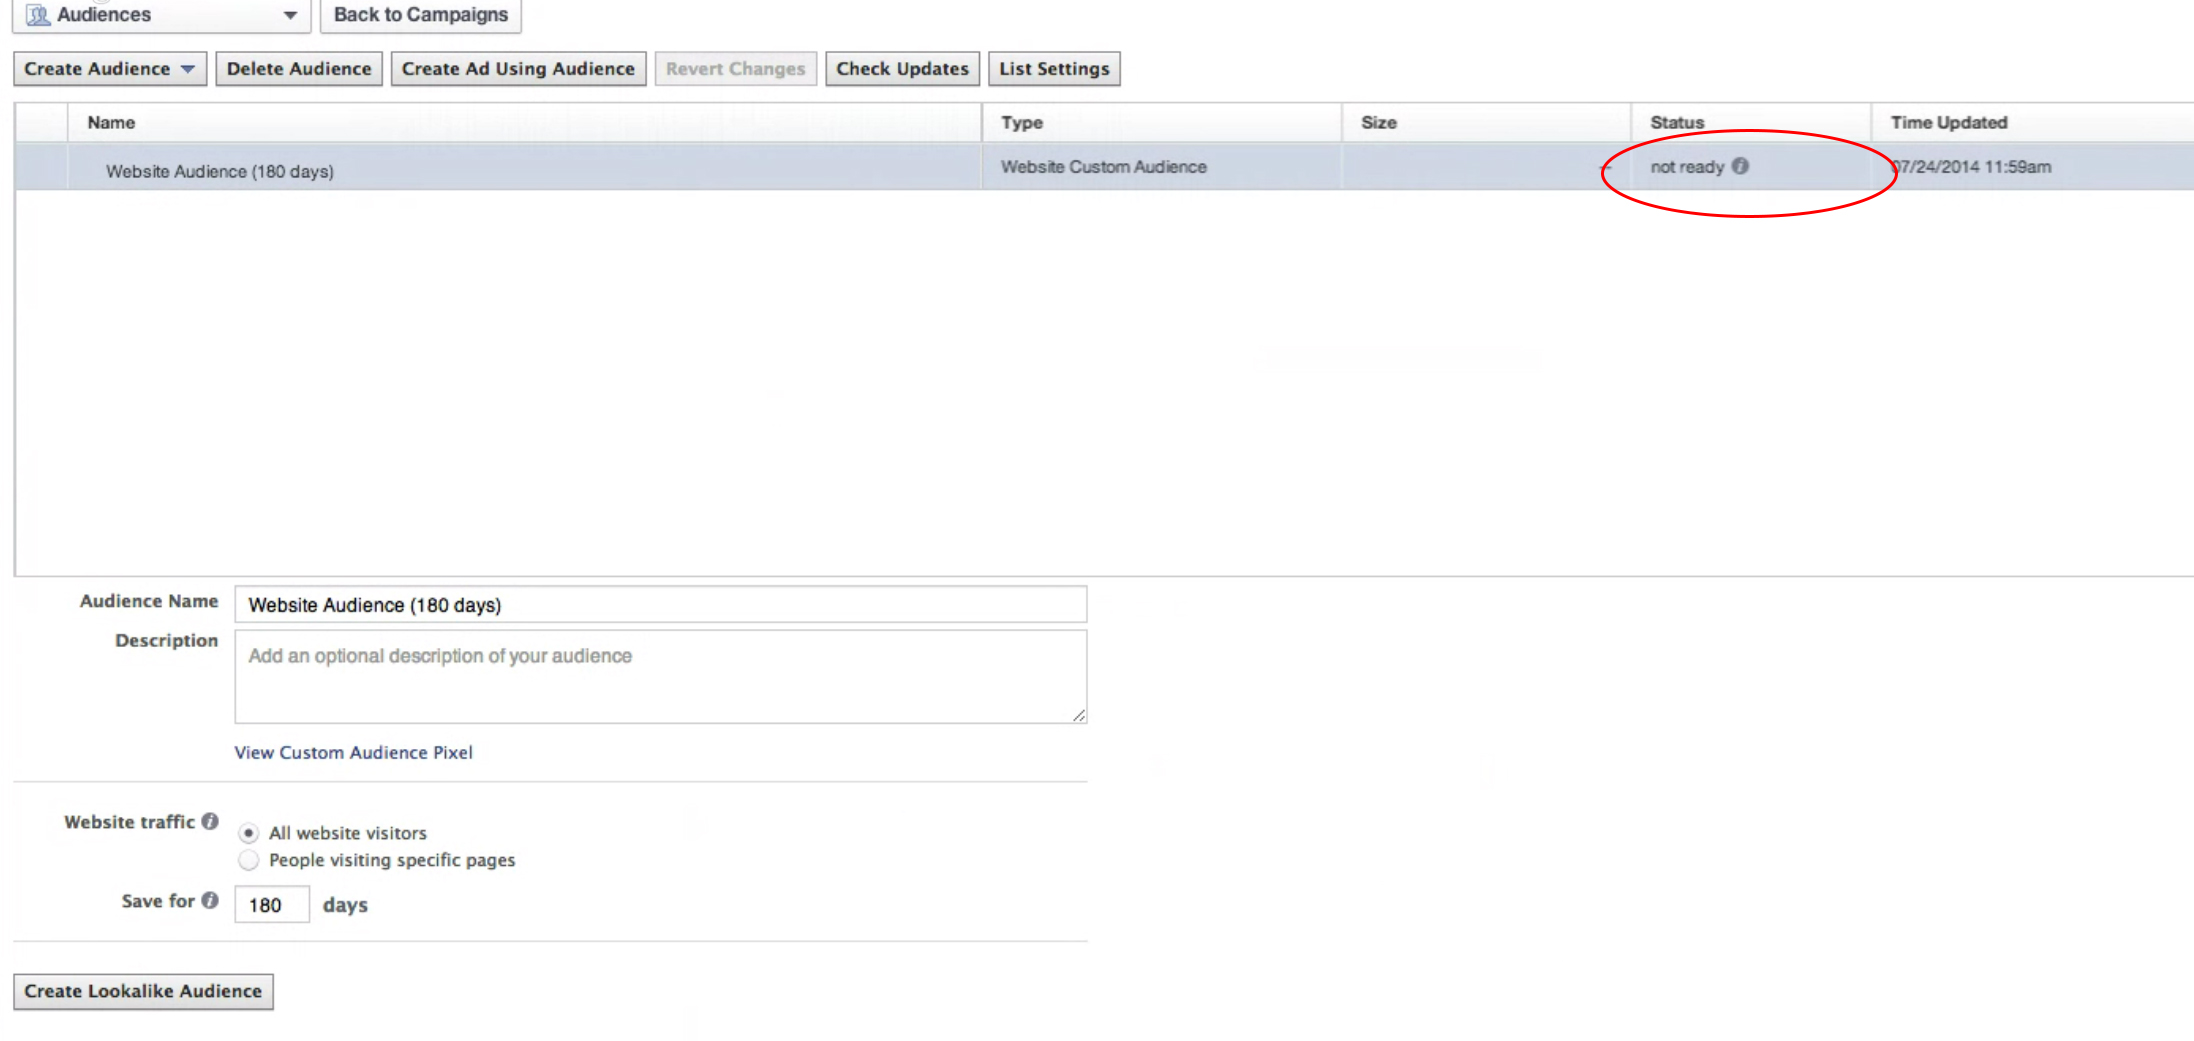
Once you've created it, you will now see the custom audience in your list of audiences. Click on that, and at the bottom you'll see a link that says “View Custom Audience Pixel.” Click on the code that shows up, and copy it.
-
The next step is to open Showit, and put the code into Showit so you can start tracking the visitors to your website!
S: I appreciate the simplification of this process. I mean, even I can do this and I'm a technoidiot.
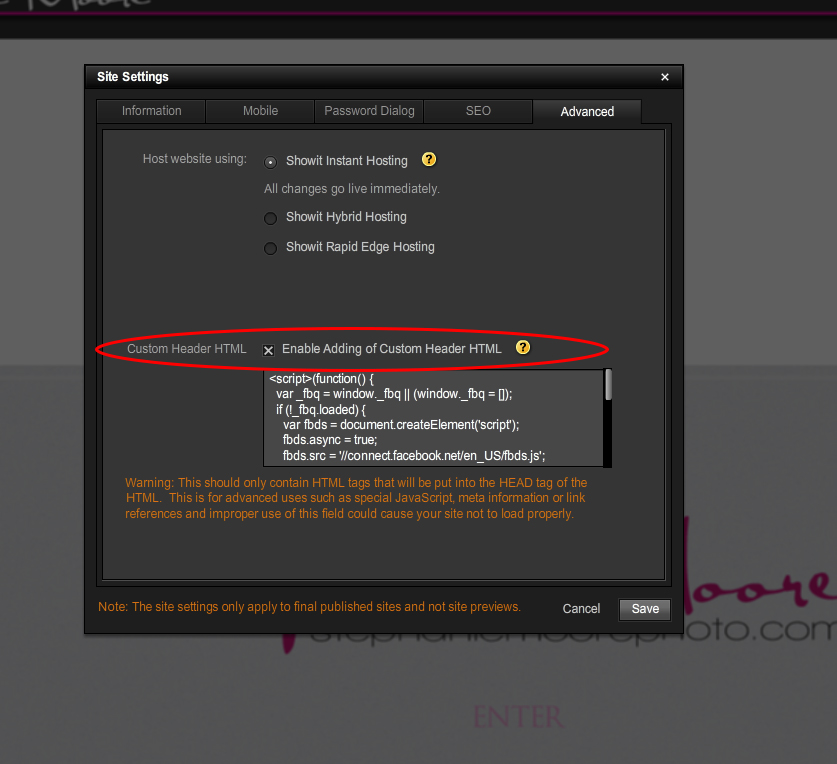
Y: I've always worked with technology, and have explained it to a full range of people. If I can teach stuff to my 78 year old mom who is technology AVERSE, then I can explain it to ANYONE!Ok, go into your Showit site, and at the top menu click “Site.” Scroll down to Settings, and then click the Advanced tab. Check the box for “Enable adding of custom header HTML,” and paste the code into the box- then click Save. Do a full publish of the site- and it's in!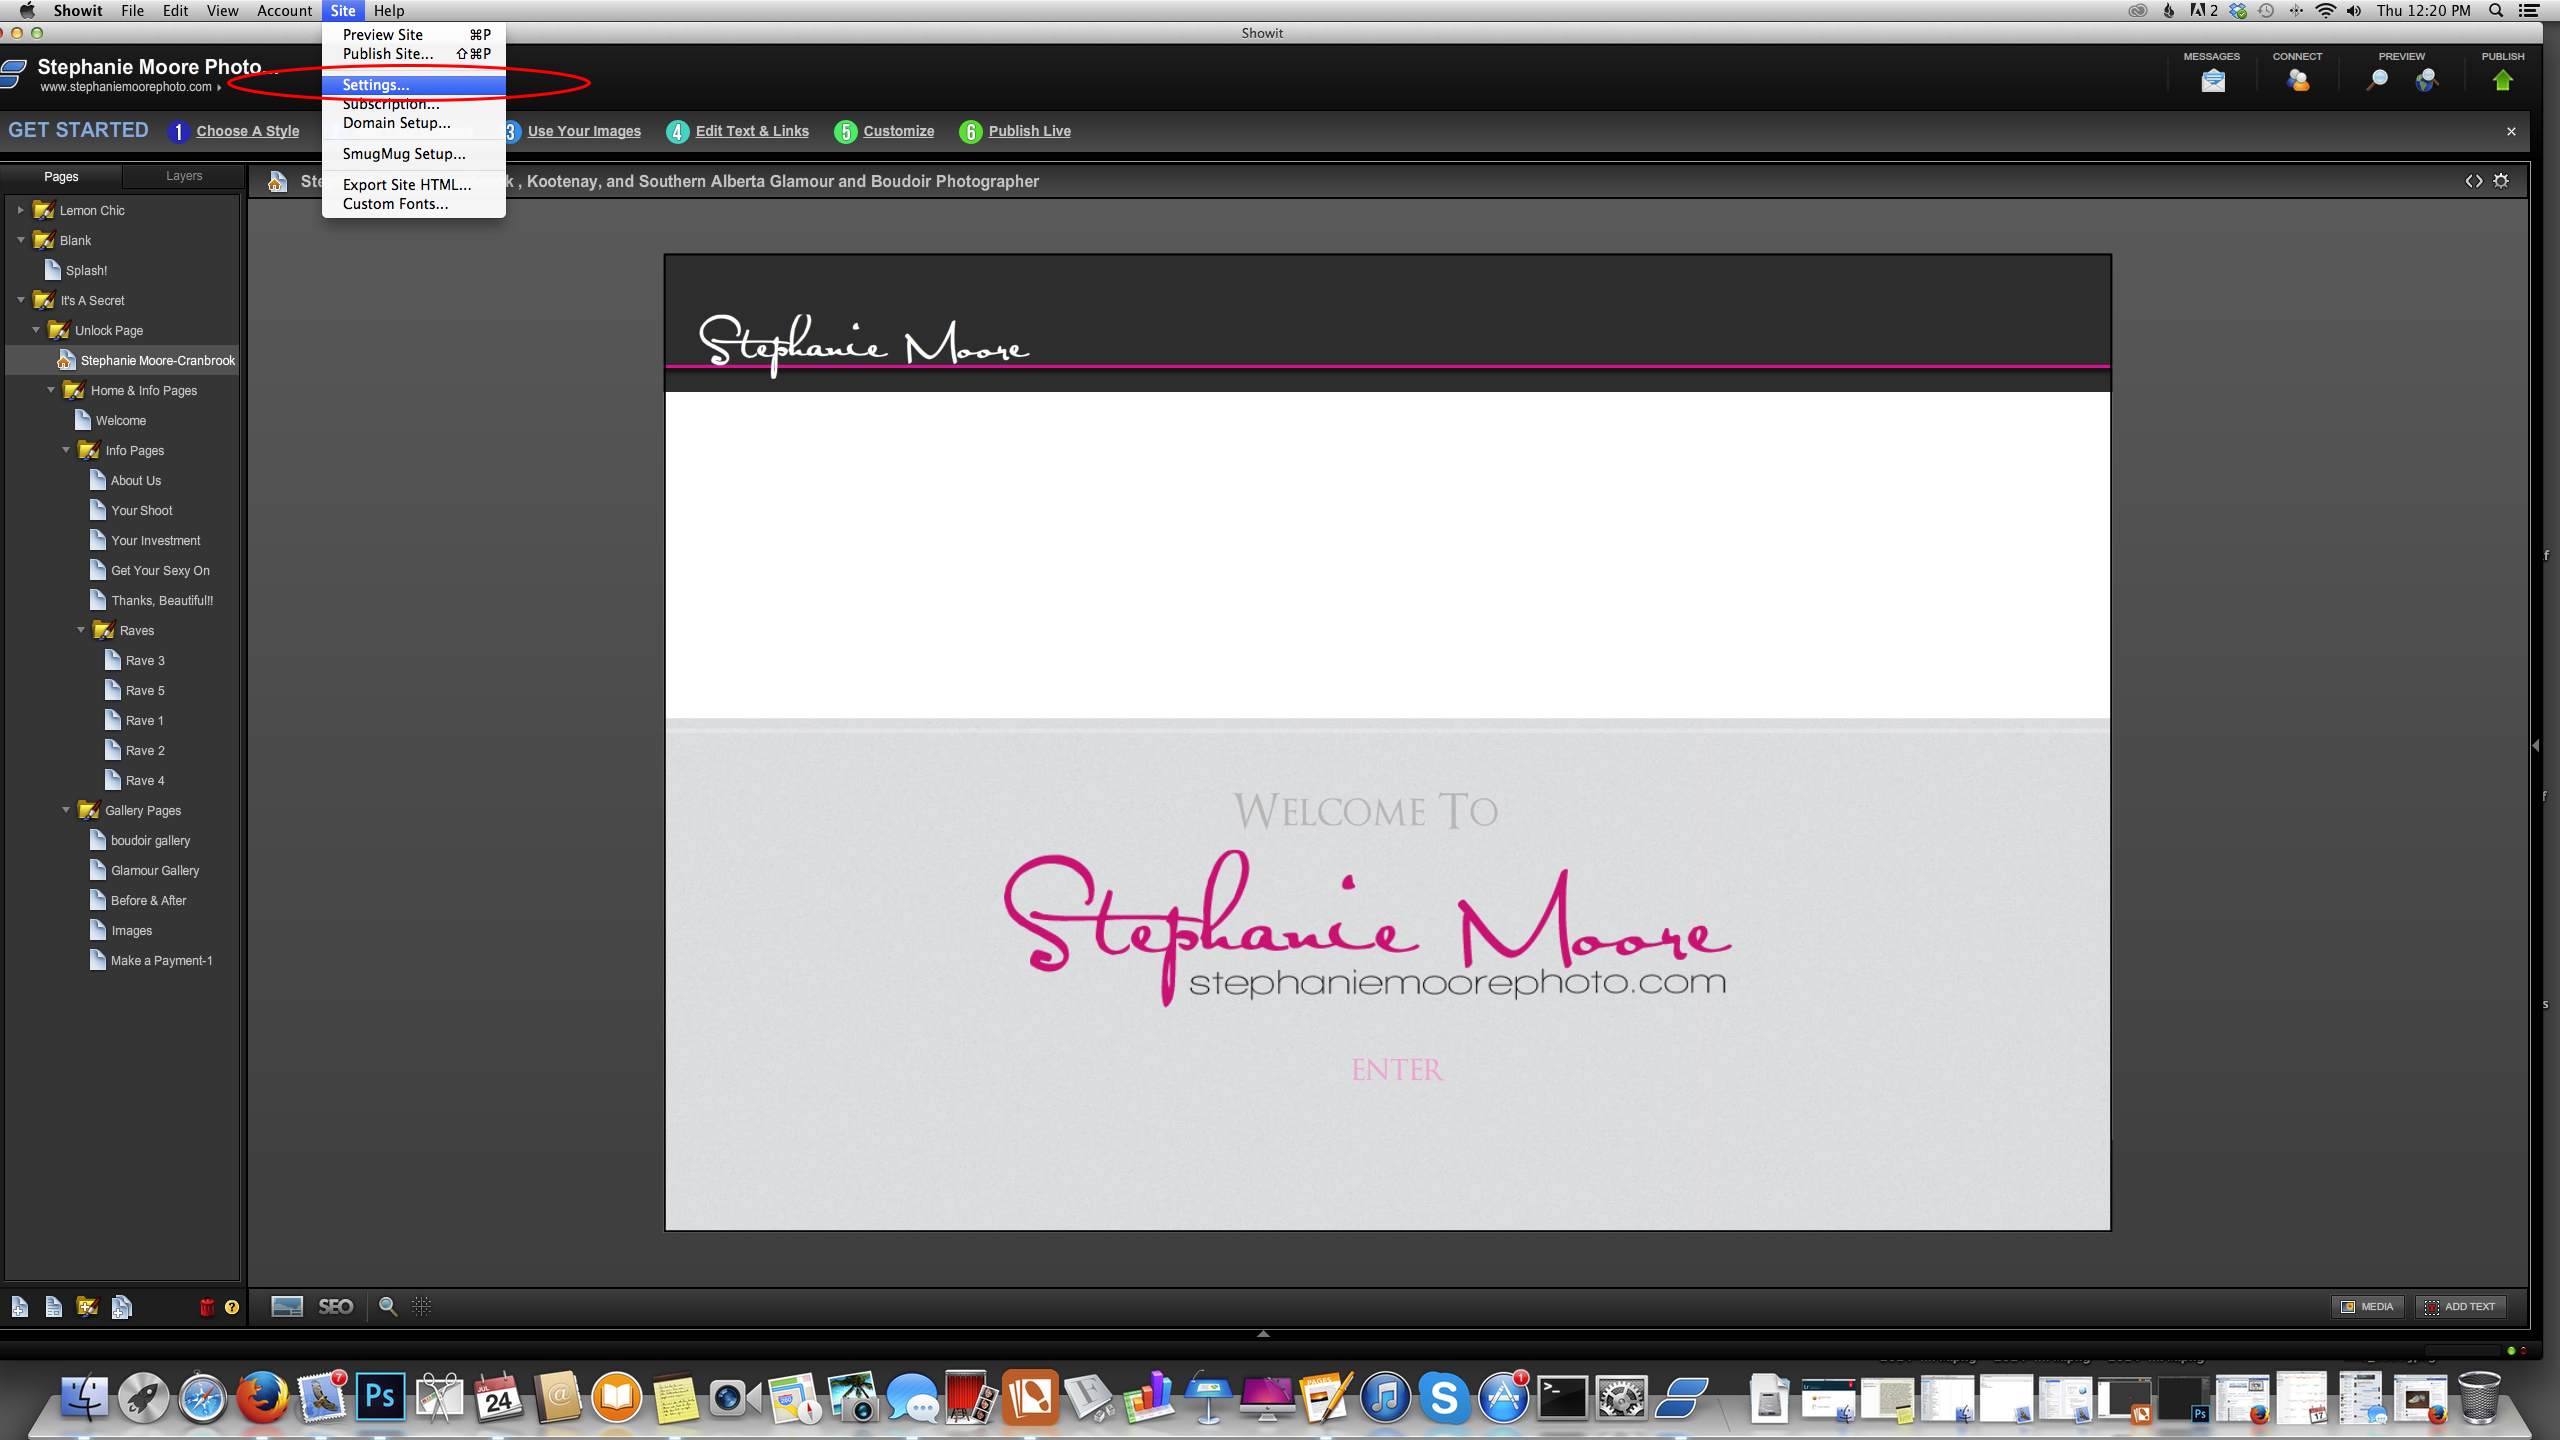
Now that you have it in there, when you go back into your Power Editor, click on the new custom audience, and it might say “not installed.” If that happens, open a new browser window and go to your own website to trigger it. - Once it is installed properly, the status will say “not ready,” and that's okay. When you have at least 20 people visit your website, the status will change and you'll be able to see the data from your visitors, and start targeting your ads to your custom audience.
** TOP SECRET TIP- shhhhh, don't tell anyone- install this pixel on all of your +Sites that are still active as well. Remember- the pixel only lasts 180 days MAX, so you don't want to put it in +Sites that no one is going to. Now you can target all of the guests that are going to your wedding +Sites, and you can boost the blog post about that specific wedding, or the specific sneak peek from that wedding to those guests. **That's it!!**Note: In some places, you are required to have a privacy policy on your site if you are tracking data from visitors. This can be a small link to a page where you say that you're tracking data to better improve your service, but make sure you create a disclosure document so people are aware that you are using their data. Certain states or countries have more specific requirements, so check out your local privacy laws. The custom pixel Terms of Service from Facebook requires you to get consent before using data- so cover your behind.**
S: Bippity boppity BOO-YA! Thanks so much Yasmeen for walking me through this and explaining it to me like I'm five. Now I'm going to get my four year old to install this for me while I make a latte!!#winning
Stay tuned for our next article on how to use this data to target your IDEAL client!!
